Fix .NET Framework 3.5 Error 0x800f0818 Installation
Have you encountered the .NET Framework 3.5 Error 0x800f0818 during installation? This article provides solutions to fix this error and successfully install .NET Framework 3.5.
Troubleshooting Methods for Installation Failures
1. Check for any pending Windows updates on the system and install them before proceeding with the .NET Framework 3.5 installation.
2. If the installation still fails, open the Command Prompt as an administrator and run the following command: dism /online /enable-feature /featurename:NetFX3 /source:C: /LimitAccess
3. Make sure to replace “C:” with the actual drive letter where the Windows installation media is located.
4. If the issue persists, try using the Windows Assessment and Deployment Kit (ADK) to create a shared resource for the installation files.
5. Ensure that the system has internet access and that there are no firewall restrictions blocking the download of the required installation files.
6. If all else fails, consider downloading the .NET Framework 3.5 installation files from the Microsoft website and running the installation from a local source.
7. If the error code 0x800f0818 still persists, consult a system administrator or IT professional for further assistance.
8. Taking these troubleshooting steps should help resolve the installation failures for .NET Framework 3.5.
Group Policy Configuration and Local Installation
To do a local installation, you need to have the Windows 10 installation media or access to the Windows 10 installation files. Then, open a Command Prompt with administrative privileges and run the following command: DISM /Online /Enable-Feature /FeatureName:NetFx3 /All /Source:X:sourcessxs /LimitAccess, replacing “X” with the drive letter where your installation media is located.
Once the command completes successfully, the .NET Framework 3.5 should be installed without encountering the 0x800f0818 error. This method can be especially useful for system administrators or network administrators who need to fix this issue across multiple computers.
Utilizing DISM for Enabling Features
| Step | Description |
|---|---|
| Step 1 | Open Command Prompt as an administrator |
| Step 2 | Run the command: dism /online /enable-feature /featurename:NetFx3 /source:D:sourcessxs /all /LimitAccess |
| Step 3 | Wait for the command to complete and then restart your computer |
Alternative Resolutions and Offline Sources
 command prompt“>
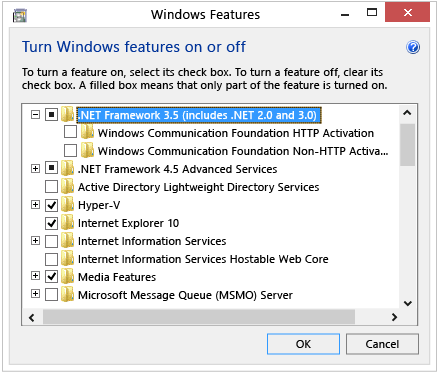
- Use the Windows Features control panel to enable the .NET Framework 3.5 feature
- Press Win + R to open the Run dialog
- Type appwiz.cpl and press Enter to open the Programs and Features window
- Click on Turn Windows features on or off in the left pane
- Check the box next to .NET Framework 3.5 (includes .NET 2.0 and 3.0)
- Click OK and follow the on-screen instructions to enable the feature
- Use an offline installation source to install .NET Framework 3.5
- Insert the Windows installation media (such as a DVD or USB drive)
- Open a Command Prompt with administrative privileges
- Type DISM /Online /Enable-Feature /FeatureName:NetFx3 /All /LimitAccess /Source:D:sourcessxs and press Enter (replace D: with the drive letter of your installation media)
- Wait for the installation to complete and then restart your computer