Windows 10/11 Laptop Automatic Repair Not Working – Quick Fixes
Encountering issues with the automatic repair feature on your Windows 10/11 laptop can be frustrating. In this article, we will discuss quick fixes to resolve this problem.
Understanding the Automatic Repair Loop
If you’re experiencing an Automatic Repair loop issue on your Windows 10/11 laptop, there are a few quick fixes you can try. Start by trying to reboot your device and pressing the F8 or Shift + F8 keys to access the Advanced Startup Options menu. From there, you can try using the Repair feature or the Command Prompt to troubleshoot and repair the system files. If that doesn’t work, you can try resetting your PC or running system tests to identify and fix any hardware issues. If you’re still having problems, it may be worth checking for any device driver updates or peripherals that could be causing the issue. Remember, the Automatic Repair feature is designed to help users self-repair their computer, but it’s not always a guaranteed solution for all issues.
Signs You’re Stuck in the Automatic Repair Loop
- Endless loop: Your laptop gets stuck in the automatic repair loop, where it automatically restarts and attempts to fix the problem without success.
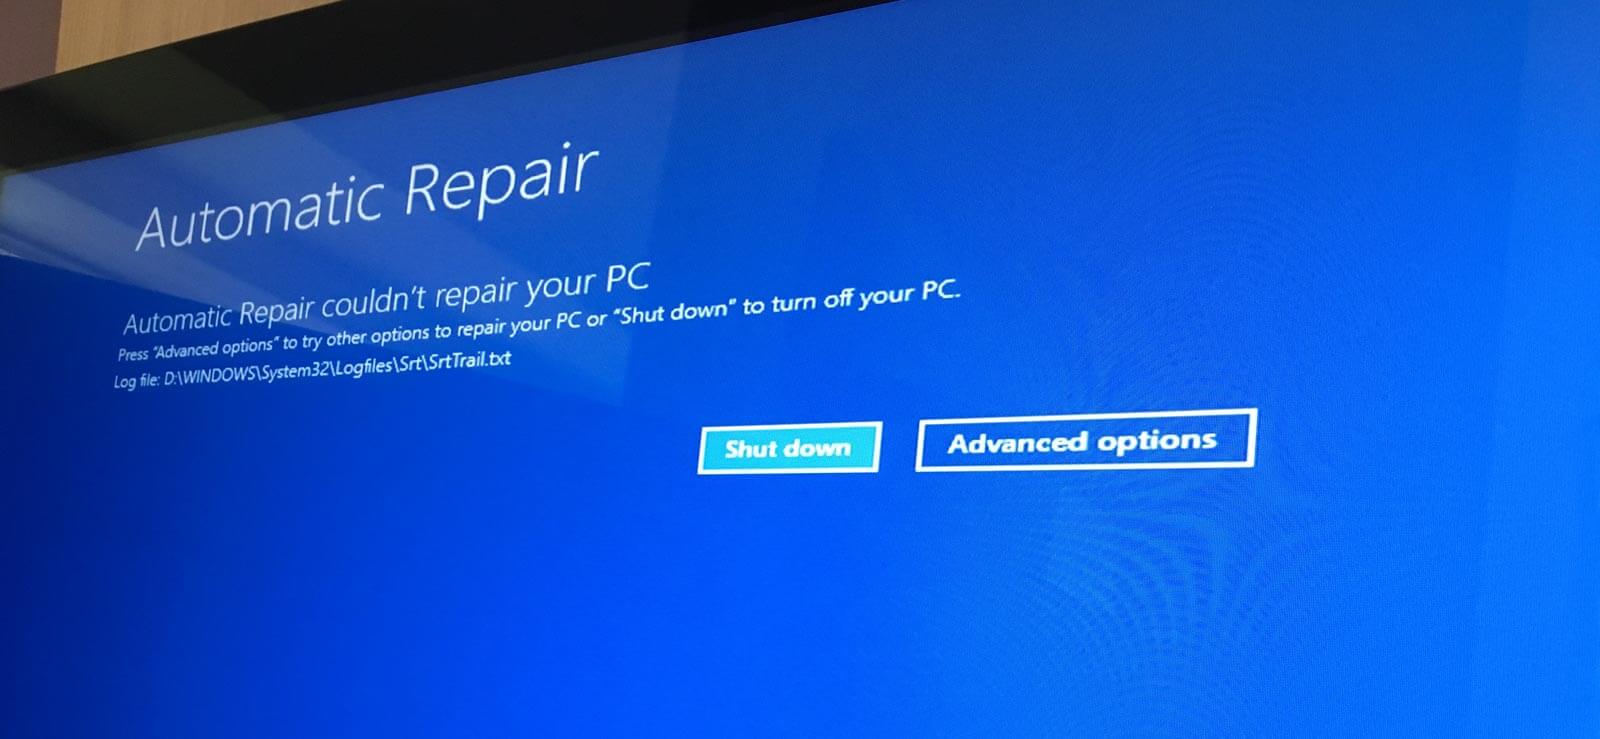
- Error messages: You see error messages such as “Automatic Repair couldn’t repair your PC” or “Your PC did not start correctly.”
- Long boot time: Your laptop takes an unusually long time to boot up, and the automatic repair process takes even longer.
- Black screen: Your laptop screen goes black and does not display anything during the automatic repair process.
- Unresponsive keyboard: Your keyboard does not respond during the automatic repair process, making it impossible to perform any troubleshooting steps.
- No access to safe mode: You cannot access safe mode to perform any advanced troubleshooting steps, as the automatic repair process overrides it.
- Repeated failure: The automatic repair process repeatedly fails, and you cannot access your laptop’s desktop or files.
Causes of the Automatic Repair Loop
Causes of the Automatic Repair Loop include corrupt system files, driver issues, boot errors, and power interruptions. Some users may experience the loop issue after attempting self-repair or troubleshooting tools. Peripherals or other hardware issues can also cause this problem. To fix it, try restarting your device or running repair systems such as the Windows Automatic Repair tool. Use command prompts or system repair tools to diagnose and fix the issue. If necessary, reset your device or perform a clean install of Windows. Keep in mind that some devices, such as Lenovo laptops, may have specific issues like freezing during the “Preparing Windows” or “Diagnosing” phase. For more solutions, refer to our article on Quick Fixes for Automatic Repair Not Working.
Undoing Changes with System Restore
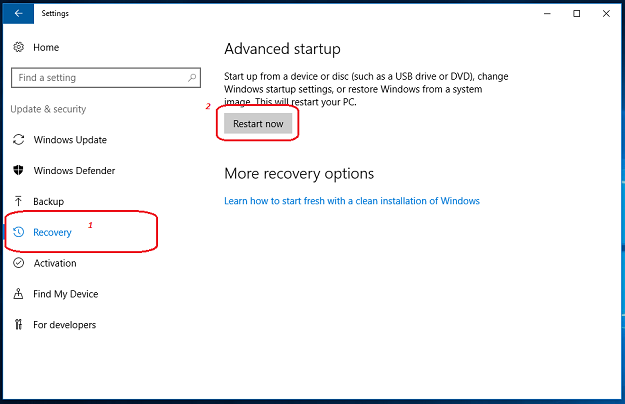
If you’re experiencing issues with your Windows 10/11 laptop and the automatic repair tool is not working, System Restore may be the solution you’re looking for.
To undo changes with System Restore, follow these steps:
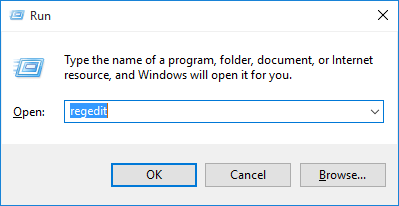
1. Press the Windows key + R to open the Run dialog box.
2. Type “rstrui” and press Enter.
3. Select a restore point that predates the issues you’re experiencing.
4. Follow the prompts to complete the restore process.
System Restore is a powerful tool that can help you fix problems with your computer caused by recent changes, including device drivers and software installations.
If you’re still experiencing issues after attempting a System Restore, there are other troubleshooting tools you can try, including the Command Prompt and Reset options. Keep testing different solutions until the problem is resolved.
Remember to always back up your important files before attempting any repairs or changes to your system.
Image credit: Shutterstock.
Fixing the Automatic Repair Loop on a Blue Screen
- Disable automatic repair
- Access the command prompt from the advanced startup options screen

- Type the following command and press Enter: bcdedit /set {default} recoveryenabled No
- Restart your computer to see if the issue has been resolved
- Perform a system restore
- Access the advanced startup options screen
- Select Troubleshoot > Advanced options > System Restore

- Choose a restore point from the list and follow the on-screen instructions
- Use the Windows Bootable USB tool
- Create a Windows Bootable USB using another computer
- Insert the USB into the affected computer and boot from it

- Select Repair your computer > Troubleshoot > Advanced options > Startup Repair
- Run SFC and DISM scans
- Access the command prompt from the advanced startup options screen
- Type the following command and press Enter: sfc /scannow
- Wait for the scan to finish and follow any on-screen instructions
- Type the following command and press Enter: dism /online /cleanup-image /restorehealth
- Wait for the scan to finish and follow any on-screen instructions
- Restart your computer to see if the issue has been resolved
Fixing the Automatic Repair Loop on a Black Screen
- Disconnect all external devices and restart the laptop
- Unplug all external devices from your laptop.
- Press and hold the Power button for 10-15 seconds to turn off your laptop.
- Press the Power button to restart the laptop.
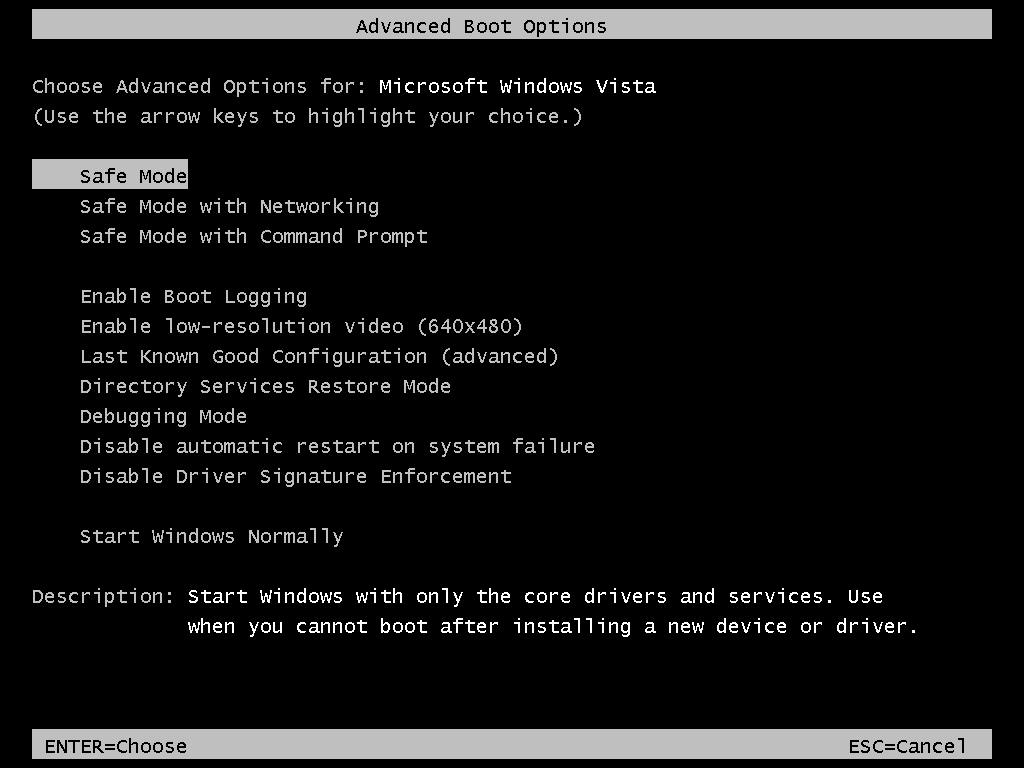
- Boot into Safe Mode and disable automatic repair
- Restart your laptop and press the F8 key repeatedly until the Advanced Boot Options menu appears.
- Select Safe Mode and press Enter.

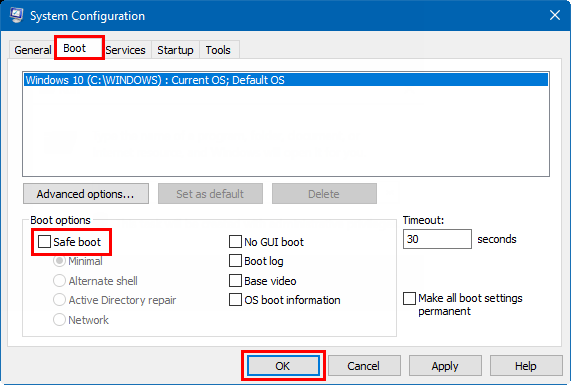
- Press the Windows key + R to open the Run dialog box.
- Type msconfig and press Enter.
- Select the Boot tab, then uncheck the box next to Safe boot and click OK.
- Restart your laptop in normal mode and check if the issue is resolved.
- Use Command Prompt to repair the system files
- Restart your laptop and press the F8 key repeatedly until the Advanced Boot Options menu appears.
- Select Repair your computer and press Enter.
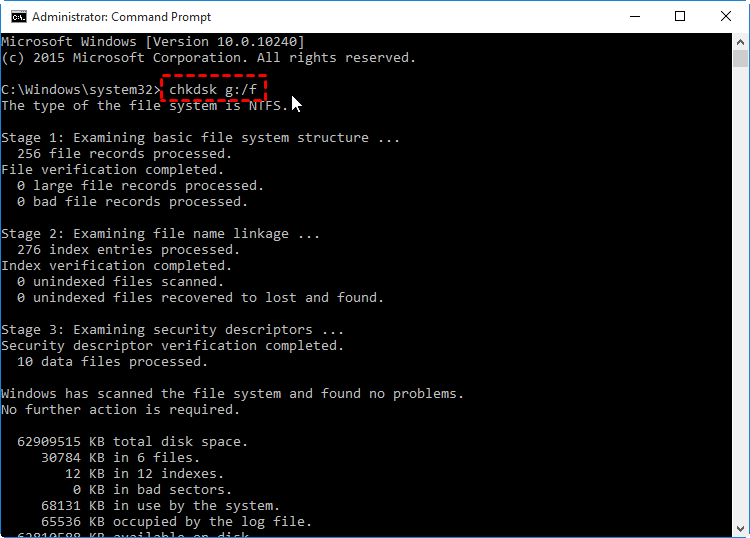
- Select Troubleshoot, then Command Prompt.
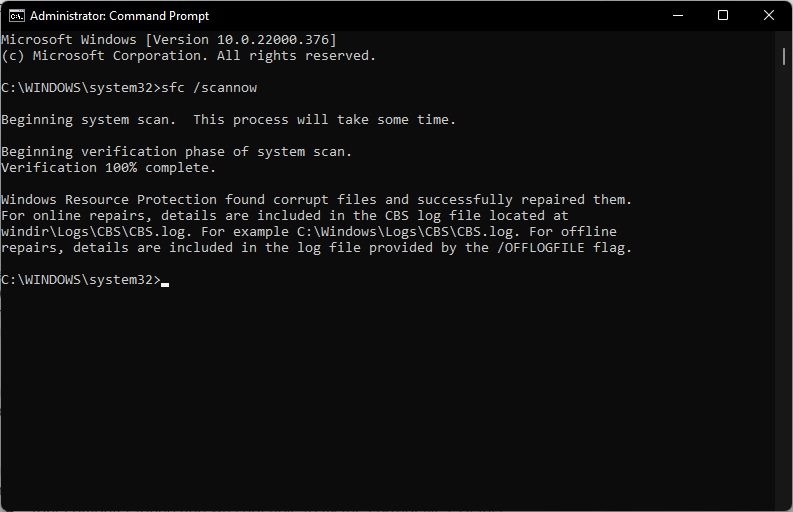
- Type sfc /scannow and press Enter to scan for and repair corrupted system files.
- Type chkdsk /r and press Enter to scan for and repair errors on the hard drive.
- Restart your laptop and check if the issue is resolved.
- Perform a system restore
- Restart your laptop and press the F8 key repeatedly until the Advanced Boot Options menu appears.
- Select Repair your computer and press Enter.
- Select Troubleshoot, then Advanced options.
- Select System Restore and follow the on-screen instructions to restore your laptop to a previous restore point.
- Restart your laptop and check if the issue is resolved.
Booting into Safe Mode to Fix the Automatic Repair Loop
- Restart Windows and enter Safe Mode
- Restart your computer by pressing the Shift key and clicking Restart
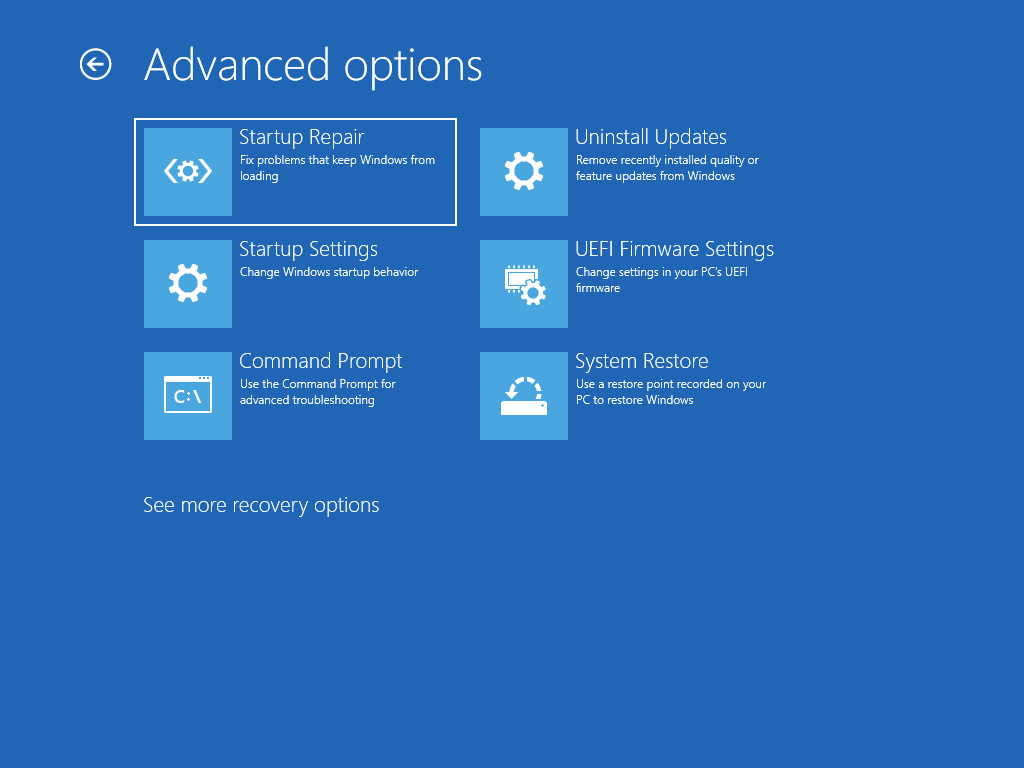
- Select Troubleshoot
- Click Advanced Options
- Click Startup Settings
- Click Restart
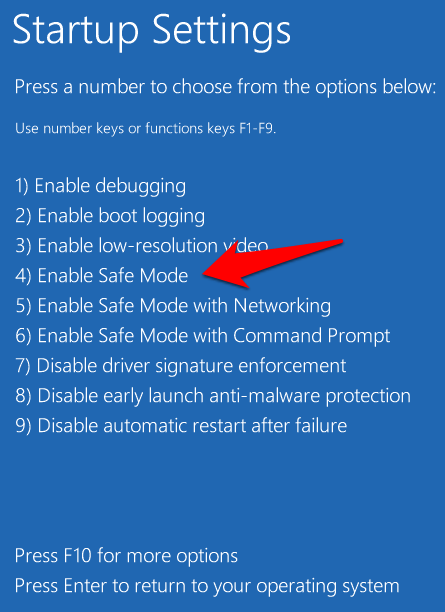
- Press F4 to enter Safe Mode
- Disable Automatic Startup Repair
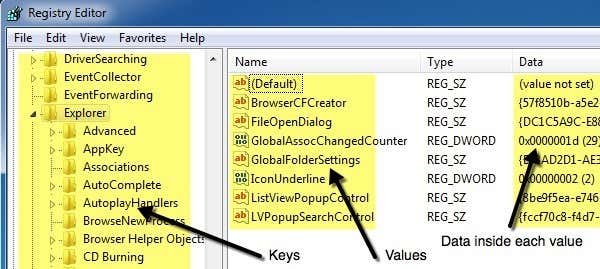
- Press the Windows key + R
- Type regedit and press Enter
- Navigate to HKEY_LOCAL_MACHINESYSTEMCurrentControlSetControlSession Manager
- Find the BootExecute key and double-click it
- Change the value data to: autocheck autochk *
- Click OK and exit Registry Editor

- Run Command Prompt
- Press the Windows key + R
- Type cmd and press Ctrl + Shift + Enter
- Type the following command: bcdedit /set {default} recoveryenabled No
- Press Enter
- Repair System Files
- Type sfc /scannow and press Enter
- Wait for the process to complete
- Type dism /online /cleanup-image /restorehealth and press Enter
- Wait for the process to complete
- Restart your computer
Disabling Automatic Repair to Fix the Loop
To disable Automatic Repair in Windows 10/11 and fix the loop, follow these steps:
1. Press the power button to turn on your PC and hold it down until it shuts off.
2. Repeat step 1 for two more attempts to trigger the Windows Automatic Repair.
3. After the third attempt, your PC will enter the Windows Recovery Environment.
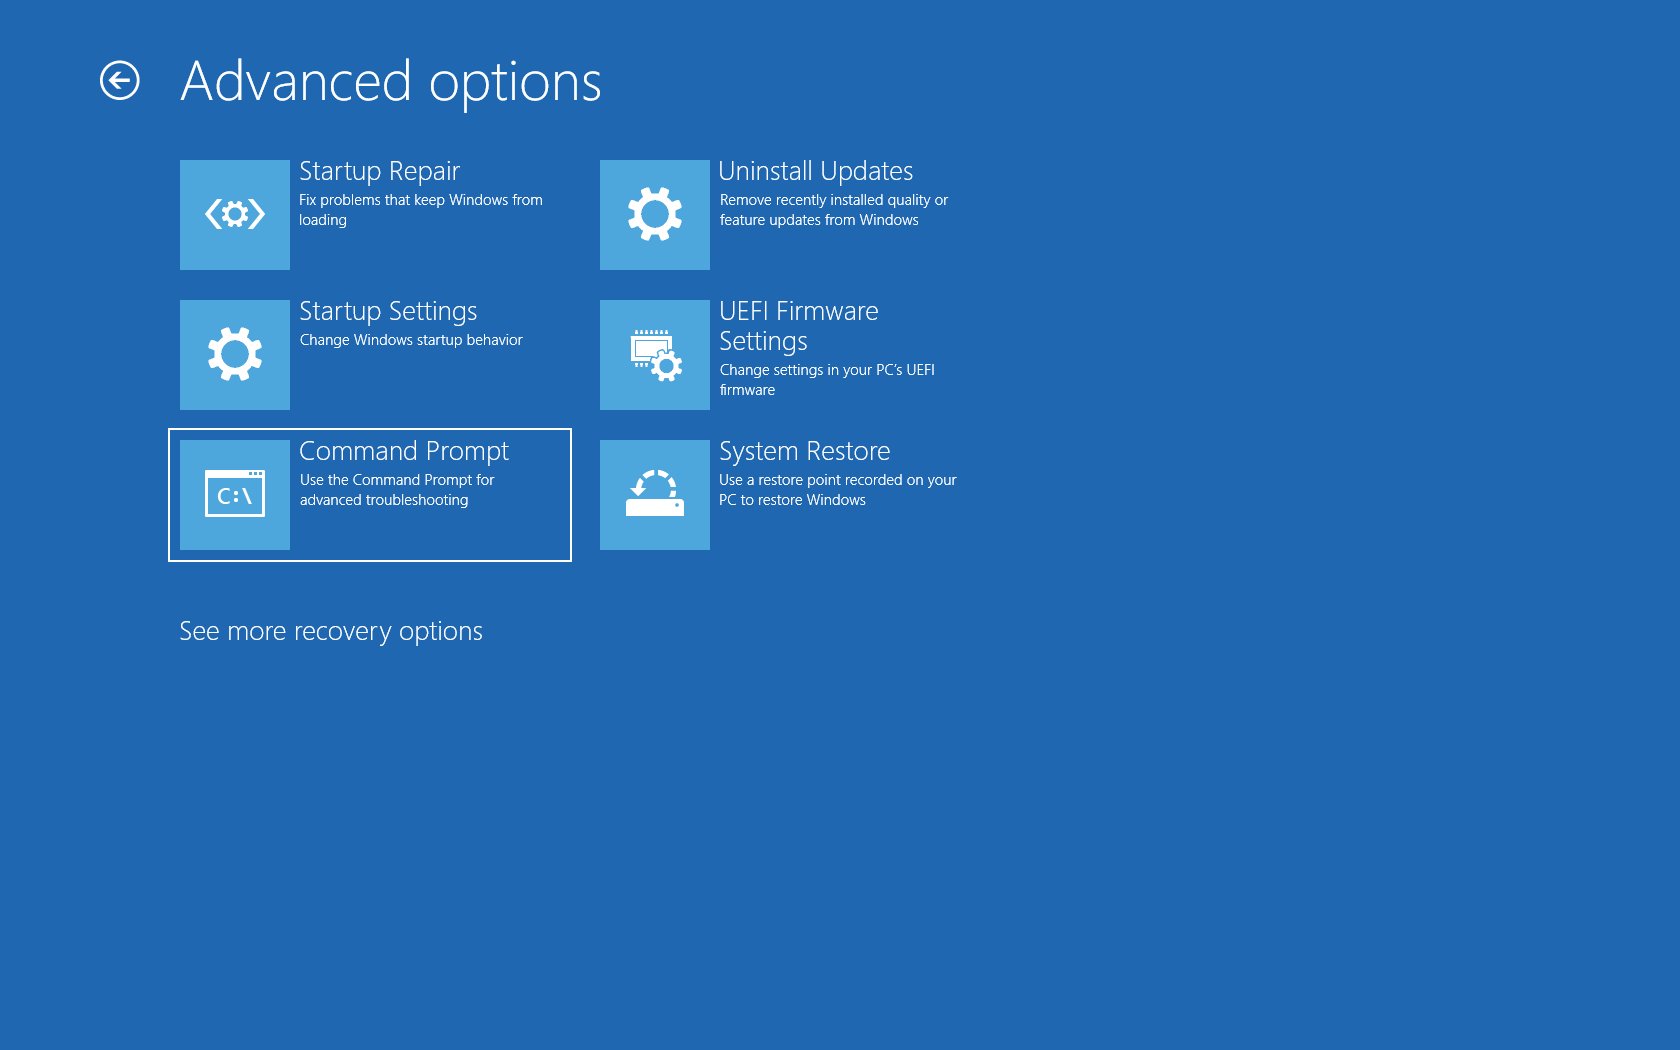
4. Click on “Advanced options” > “Troubleshoot” > “Advanced options”.
5. Click on “Command Prompt”.
6. Type “bcdedit /set {default} recoveryenabled No” and press enter.
7. Type “exit” and press enter.
8. Click on “Continue” to restart your PC and boot into Windows.
Disabling Automatic Repair should fix the loop and allow you to boot into Windows normally. If this method doesn’t work, try using system repair tools or restoring your PC to a previous restore point.
Running Fixboot and Chkdsk Commands to Repair the Loop
| Command | Description |
|---|---|
| Fixboot | Command used to repair the boot sector of the Windows operating system. |
| Chkdsk | Command used to check for errors on the hard drive and repair them if necessary. |
Performing a System Scan in Safe Mode to Fix the Loop
Performing a System Scan in Safe Mode is a quick fix for the loop in Windows 10/11 Laptop Automatic Repair not working. To begin, restart your computer and press the Shift key while it boots up to enter Safe Mode. Once in Safe Mode, click the Start button and type “cmd” in the search bar. Right-click on the Command Prompt and select “Run as administrator.” In the Command Prompt, type “sfc /scannow” and press Enter to begin the system scan. This will check for any corrupted system files and repair them. Once the scan is complete, restart your computer normally and check if the loop issue has been resolved. If not, try other quick fixes or consider seeking professional help.
Restoring the Windows Registry to Fix the Loop
| Restoring the Windows Registry to Fix the Loop |
|---|
|
If the Automatic Repair loop is caused by a corrupted or damaged registry, restoring it to a previous state may help resolve the issue. Here’s how to do it:
Note: If you don’t have a backup of your registry, you can try using a third-party registry cleaner tool to repair and optimize it. However, be cautious as some tools may cause more harm than good. |

Disabling Early Launch Anti-Malware to Fix the Loop
- Restart the computer and press the F8 key repeatedly until the advanced boot options menu appears.
- Select Disable early launch anti-malware protection and press Enter.
- If the option is not available, open the command prompt in the advanced options menu.
- Type bcdedit /set {default} bootmenupolicy legacy and press Enter.
- Restart the computer and press the F8 key repeatedly until the advanced boot options menu appears.
- Select Disable early launch anti-malware protection and press Enter.
Resetting Your Windows 10 Device to Fix the Loop
| Resetting Your Windows 10 Device to Fix the Loop | |
|---|---|
| Step 1 | Press and hold the power button on your laptop until it turns off completely. |
| Step 2 | Press the power button again to turn on your laptop. |
| Step 3 | When the Windows logo appears on your screen, press and hold the power button again to turn off your laptop. |
| Step 4 | Repeat this process two more times. |
| Step 5 | On the fourth time, the Automatic Repair screen will appear. |
| Step 6 | Select “Advanced options”. |
| Step 7 | Select “Troubleshoot”. |
| Step 8 | Select “Reset this PC”. |
| Step 9 | Select “Remove everything”. |
| Step 10 | Follow the on-screen instructions to complete the reset process. |
Going the Extra Mile with Automatic Backups on Windows 10
Automatic backups can save you from data loss and inconvenience in the event of unexpected issues with your Windows 10/11 laptop. While the built-in Windows backup tools are useful, you can go the extra mile by using third-party backup software like EaseUS Todo Backup, Acronis True Image, or Macrium Reflect.
Step 1: Select a reliable backup software and install it on your laptop.
Step 2: Create a backup task to include all important files, documents, and system files.
Step 3: Set up the backup to run automatically at a regular interval, such as daily or weekly.
Step 4: Check that the backup is working correctly by running a test restore.
By following these steps, you can ensure that your laptop is always protected against data loss and can recover quickly from boot errors or system failures. Remember to keep your backup software up-to-date and periodically check the integrity of your backups to ensure their effectiveness.
When Automatic Repair is Not Working
If Automatic Repair is not working on your Windows 10/11 laptop, there are a few quick fixes you can try. First, try restarting your device and entering Safe Mode by pressing the F8 key during startup. From there, you can try running a system file check by opening a command prompt and typing “sfc /scannow“. If that doesn’t work, you can try using the DISM tool by typing “dism /online /cleanup-image /restorehealth” in the command prompt. Another option is to use the Windows Startup Repair tool by pressing F11 during startup. If all else fails, you may need to repair Windows using installation media. It’s also important to make sure your device drivers are up to date. If you continue to experience issues, consider diagnosing and repairing system errors or seeking professional help.
Final Thoughts on Dealing with the Automatic Repair Loop
In conclusion, dealing with the automatic repair loop can be frustrating, but there are some quick fixes you can try. First, check for any hardware issues that may be causing the problem. Then, try booting in safe mode and running a virus scan. If that doesn’t work, you can try disabling automatic repair or performing a system restore. It’s also worth noting that some Lenovo laptops may have issues with preparing Windows, while Dell Inspiron laptops may freeze during the repair process. Remember that these fixes may not work for everyone, as there are many variables at play when it comes to repairing a Windows system. If all else fails, seek professional help or consider upgrading to a newer version of Windows.