Fix Windows 8 Stuck in Automatic Repair Loop
Unraveling the perplexing maze of Windows 8’s Automatic Repair Loop, this article delves into effective solutions to liberate your system from its repetitive woes.
Understanding the Automatic Repair Loop in Windows
If your Windows 8 is stuck in an automatic repair loop, there are a few steps you can take to resolve the issue. First, try restarting your PC by pressing the power button. If that doesn’t work, you can use the Windows Automatic Repair feature to troubleshoot and fix the problem. To do this, follow these steps:
1. Hold down the power button to force a restart.
2. When the “Preparing Automatic Repair” screen appears, press and hold the power button again to turn off your computer.
3. Repeat steps 1 and 2 two more times.
4. On the fourth restart, Windows should boot into the Automatic Repair screen.
5. From here, you can choose to use the troubleshooter or access the command prompt for further troubleshooting.
Remember to back up your data before attempting any repairs, as there is a chance that your files could be lost during the process. If you’re unable to fix the issue using the Automatic Repair feature, you may need to seek assistance from forums or professional users.
Preventing the Windows Automatic Repair Loop
If your Windows 8 is stuck in an automatic repair loop, there are a few steps you can take to resolve the issue and get your computer back up and running.
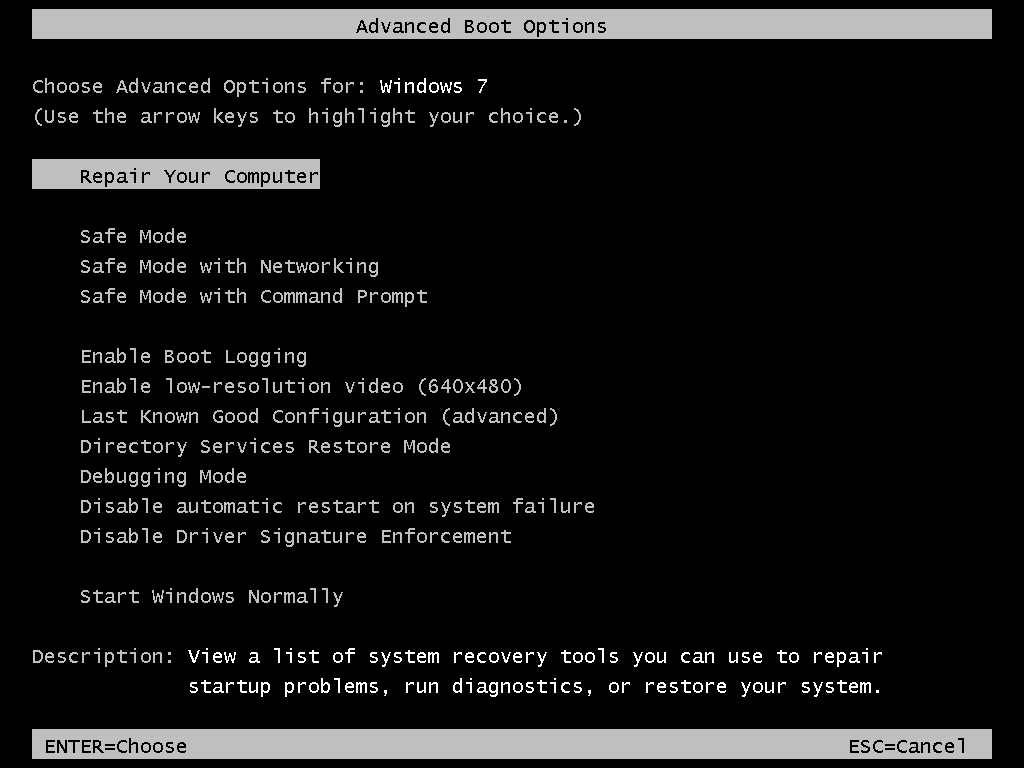
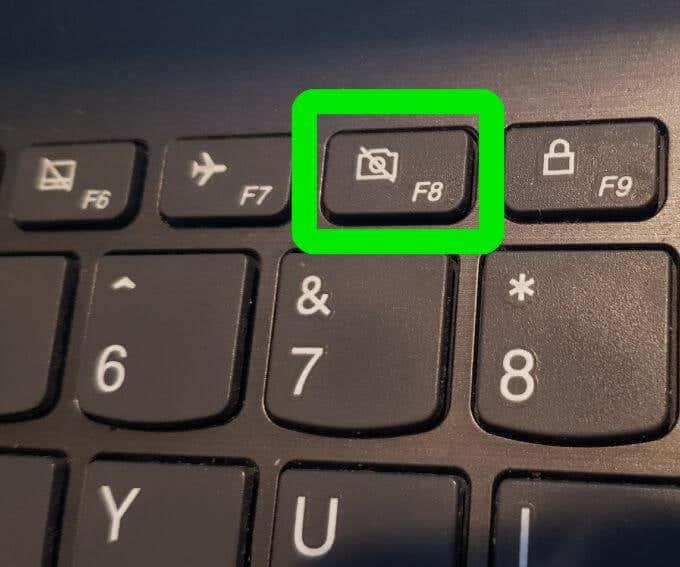
First, try restarting your PC and pressing the F8 key repeatedly during startup to access the Advanced Boot Options menu. From there, select “Safe Mode” and see if you can launch the system without encountering the automatic repair loop.
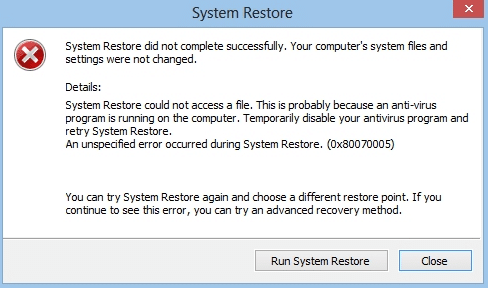
If that doesn’t work, you can try using the Windows 8 recovery feature called “OneKey Recovery” on Lenovo laptops or “System Restore” on other devices. These tools can help you revert your system back to a previous working state.
If those options fail, you may need to use a recovery disk or USB drive to access the command prompt and manually fix any system file errors.
Remember to always back up your data before attempting any troubleshooting operation. If you need to recover lost files, consider using reliable data recovery software like MiniTool Power Data Recovery or AOMEI Backupper.
For more detailed solutions, consult forums or seek help from other users who have experienced the same issue.
Accessing Recovery Tools in Windows
If you find yourself stuck in an automatic repair loop on your Windows 8 device, don’t worry. There are several recovery tools available to help you fix the issue.
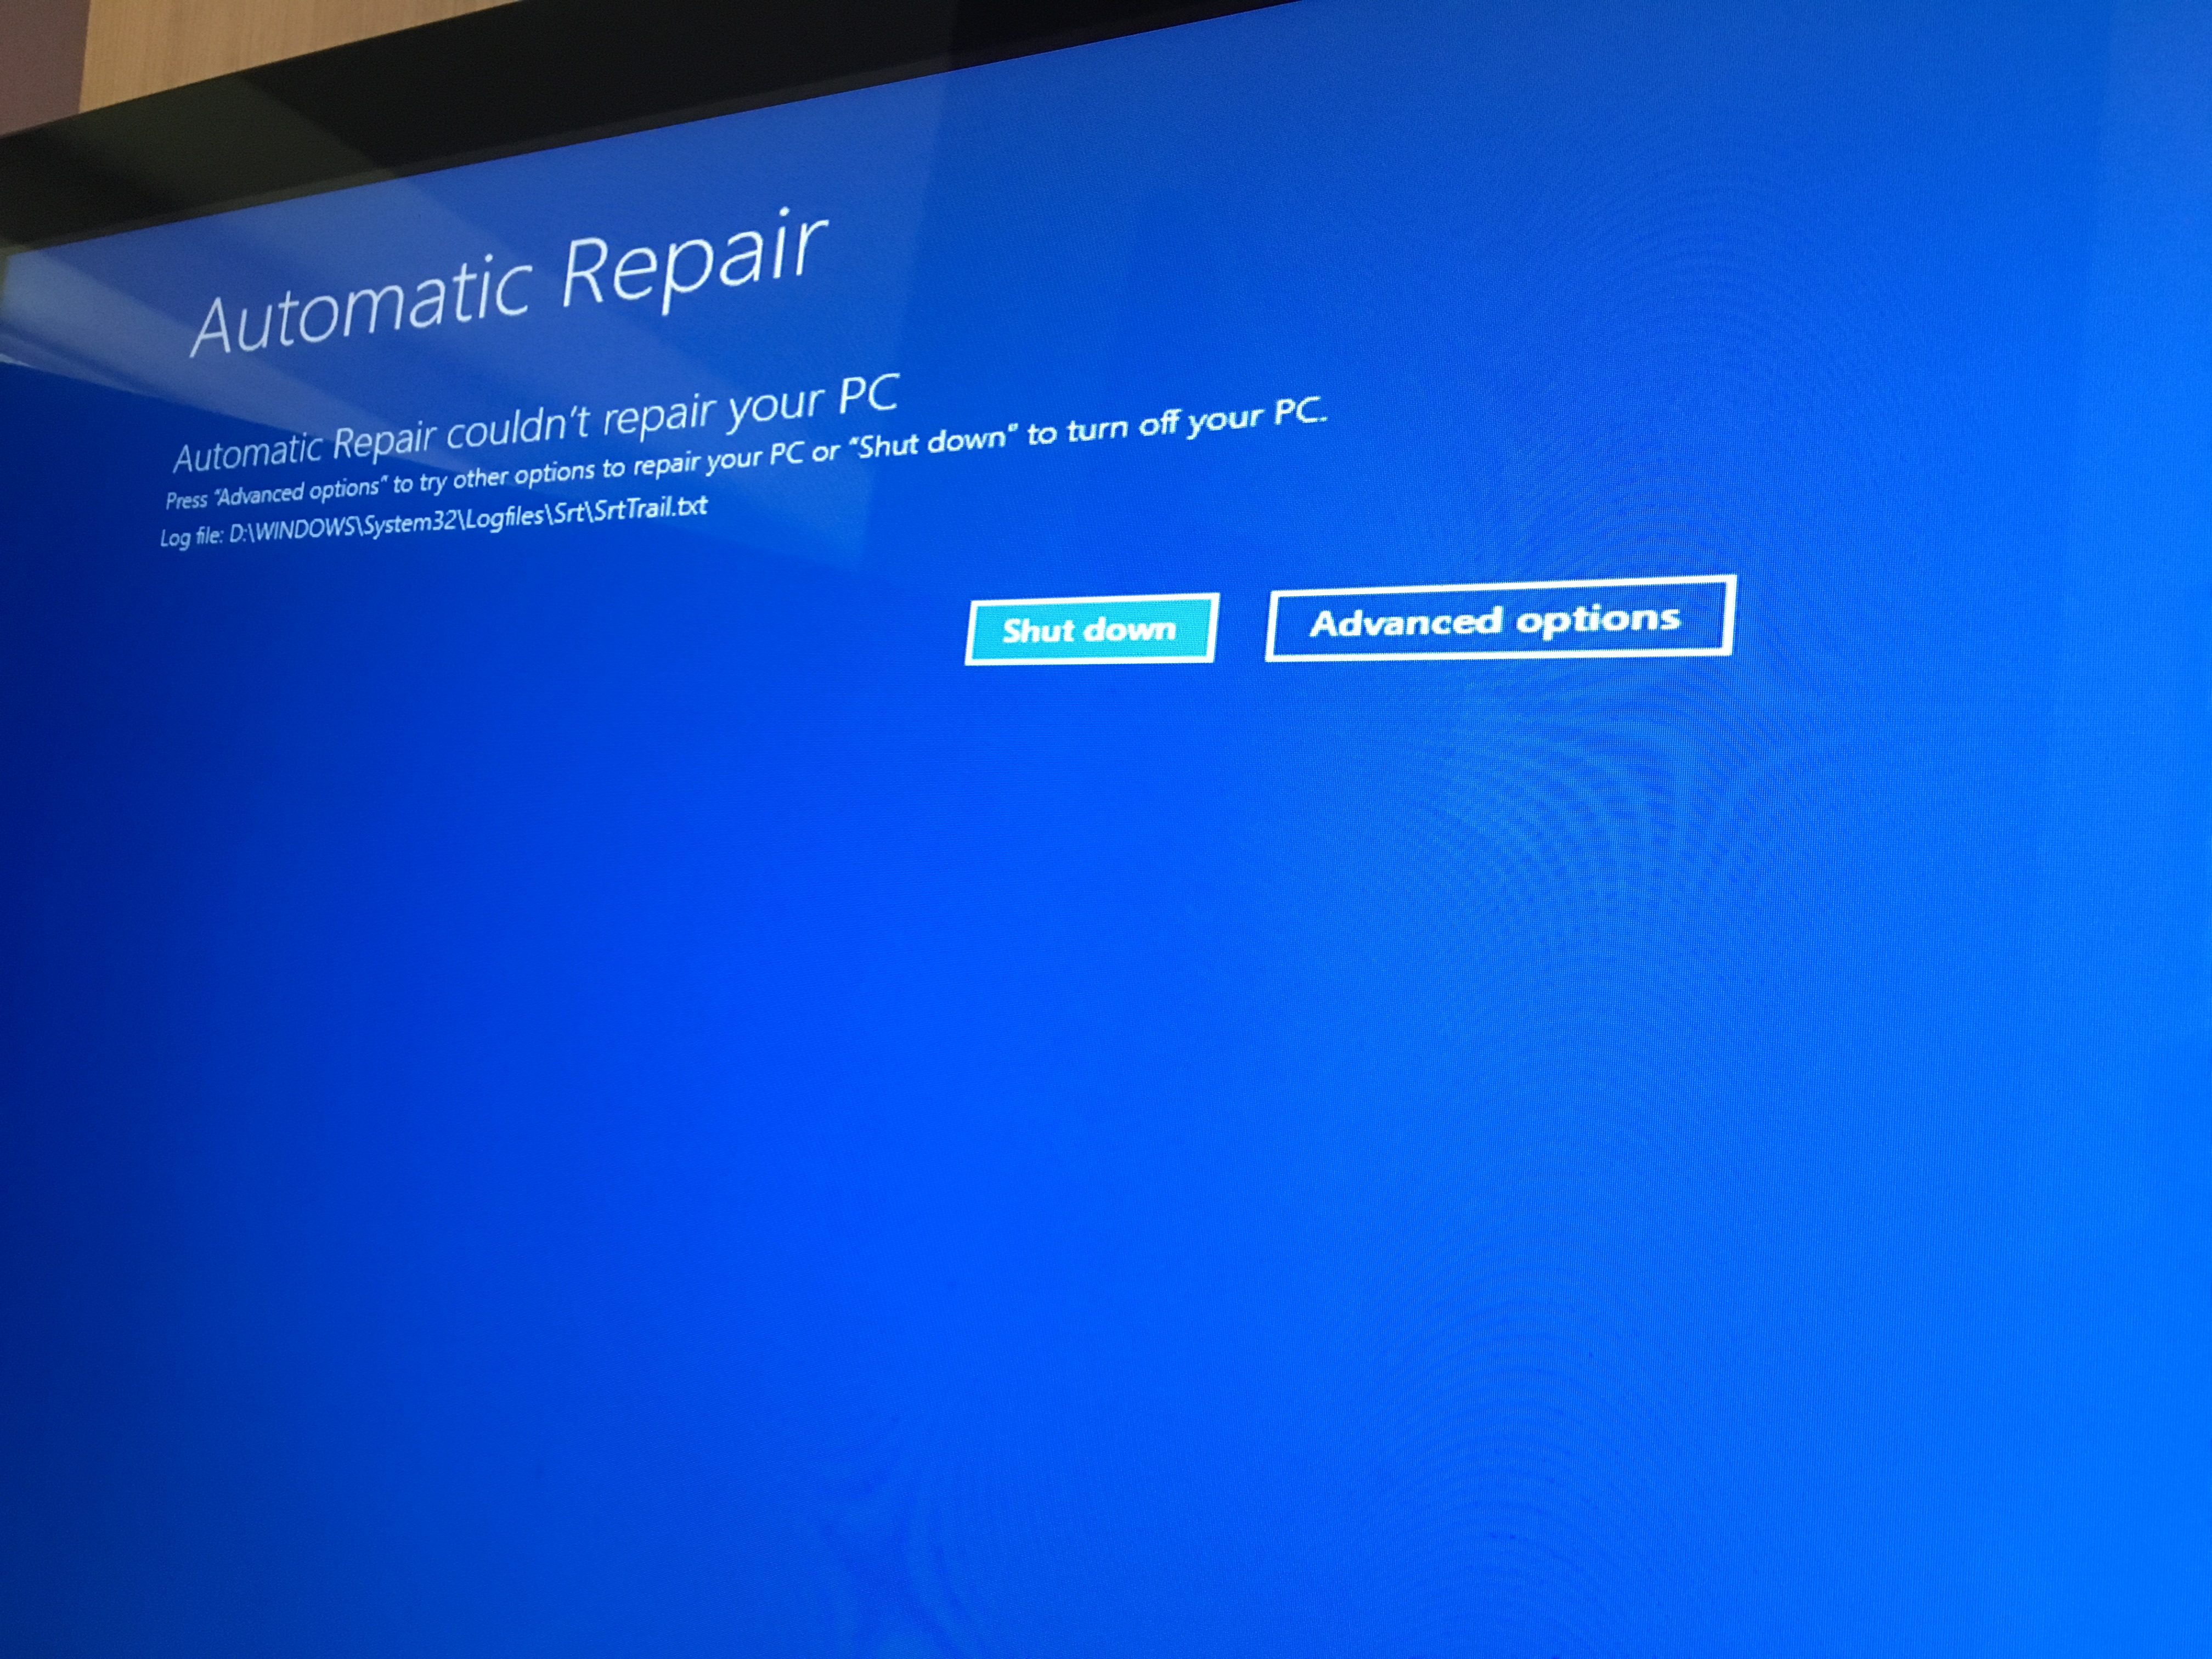
One method is to use the Windows Recovery Environment (WinRE), which can be accessed by restarting your device and pressing the F8 key repeatedly until the Advanced Boot Options menu appears. From there, select “Repair your computer” and then choose “Troubleshoot” followed by “Advanced options.”
Another option is to use a recovery disk or USB drive. Insert the disk or drive into your device and restart it. Press any key to boot from the disk or drive, and then select your language preferences. Choose “Repair your computer” and follow the on-screen instructions.
If these methods don’t work, you can try using third-party software like AOMEI Backupper or MiniTool Power Data Recovery. These programs can help you recover your data and fix any system file errors that may be causing the loop issue.
Remember to always back up your important files before attempting any recovery or repair operations.
python

import subprocess
# Step 1: Boot into Windows 8 recovery mode
subprocess.call(['shutdown', '/r', '/o', '/t', '0'])
# Step 2: Wait for the computer to restart into recovery mode
# You may need to manually select the recovery options depending on your system
# Step 3: Open Command Prompt in the recovery mode
# Step 4: Disable automatic repair
subprocess.call(['bcdedit', '/set', '{default}', 'recoveryenabled', 'No'])
# Step 5: Check if your system partition is labeled 'C:'
# If not, modify the drive letter accordingly in the next step
# Step 6: Run a disk check on the system drive
subprocess.call(['chkdsk', 'C:', '/f'])
# Step 7: Attempt to fix any issues found with the disk check
subprocess.call(['sfc', '/scannow', '/offbootdir=C:', '/offwindir=C:Windows'])
# Step 8: If the above steps didn't resolve the issue, you may need to rebuild the BCD
subprocess.call(['bootrec', '/fixmbr'])
subprocess.call(['bootrec', '/fixboot'])
subprocess.call(['bootrec', '/rebuildbcd'])
# Step 9: Restart the computer and check if the automatic repair loop is resolved
subprocess.call(['shutdown', '/r', '/t', '0'])
Please note that the above code is a simple illustration and might not necessarily solve the issue in all cases. It is always recommended to have a backup of your important data before attempting any system modifications or repairs. Additionally, it is advisable to seek professional assistance or consult relevant documentation for a comprehensive understanding of the steps involved in fixing specific issues.
Quick Fixes for the Windows Automatic Repair Loop
- Restart your computer and repeatedly press the F8 key.
- Select the “Disable automatic restart on system failure” option.
- Press Enter to continue booting into Windows.
Method 2: Use System Restore
- Restart your computer and repeatedly press the F8 key.
- Select “Repair your computer” from the Advanced Boot Options menu.
- Select your preferred keyboard layout and click Next.
- Log in with your username and password.
- Select “System Restore” from the System Recovery Options menu.
- Choose a restore point before the issue occurred and click Next.
- Follow the on-screen instructions to complete the system restore process.
Method 3: Use Command Prompt
- Restart your computer and repeatedly press the F8 key.
- Select “Repair your computer” from the Advanced Boot Options menu.
- Select your preferred keyboard layout and click Next.
- Log in with your username and password.
- Select “Command Prompt” from the System Recovery Options menu.
- Type the following command: bootrec /fixmbr
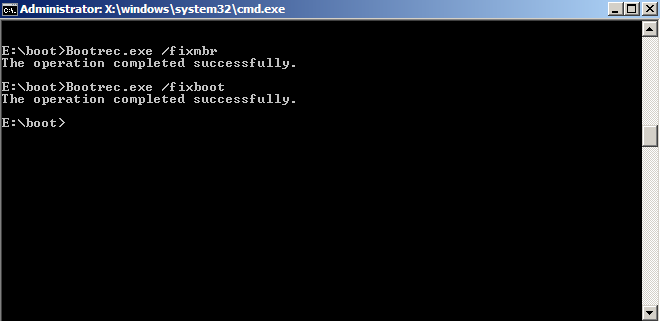
- Press Enter to execute the command.
- Type the following command: bootrec /fixboot
- Press Enter to execute the command.
- Type the following command: bootrec /rebuildbcd
- Press Enter to execute the command.
- Restart your computer and see if the automatic repair loop issue is resolved.
Method 4: Refresh or Reset Your PC
- Restart your computer and repeatedly press the F8 key.
- Select “Repair your computer” from the Advanced Boot Options menu.
- Select your preferred keyboard layout and click Next.
- Log in with your username and password.
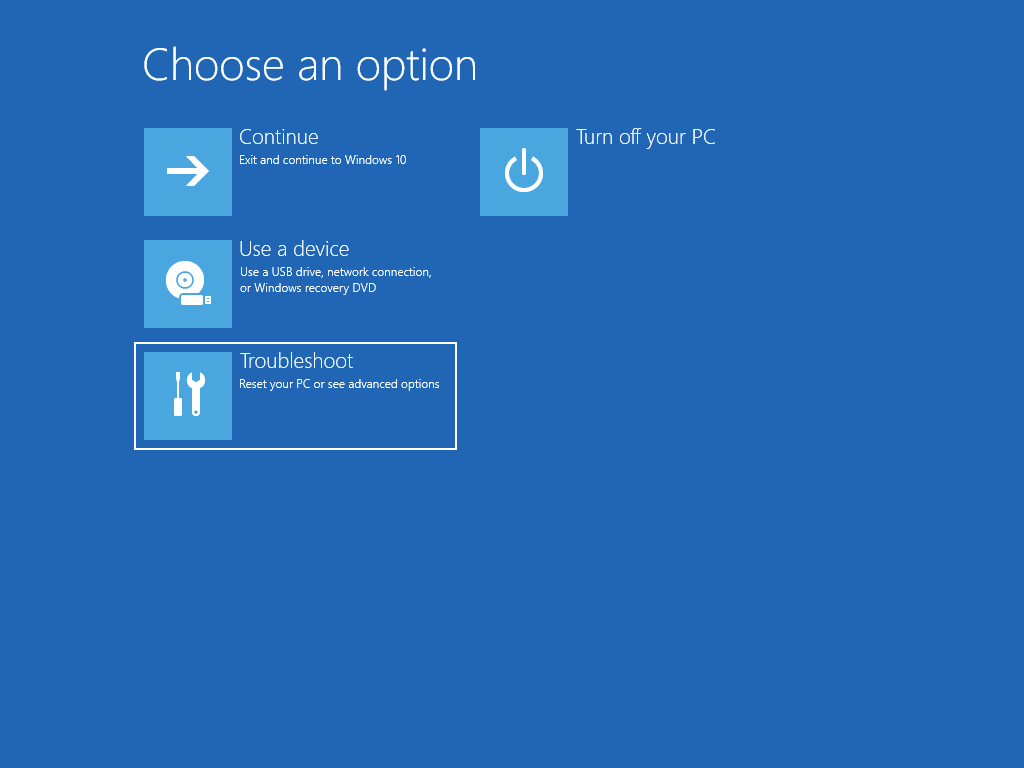
- Select “Troubleshoot” from the System Recovery Options menu.
- Select “Refresh your PC” or “Reset your PC” depending on your preference.
- Follow the on-screen instructions to complete the process.
Restarting Your Computer to Fix the Issue
If your Windows 8 is stuck in an automatic repair loop, one simple solution is to restart your computer. This can help resolve many common issues and get your system back up and running smoothly.
To restart your computer, follow these steps:
1. Press and hold the power button until your computer turns off.
2. Wait a few seconds, then press the power button again to turn it back on.
After restarting, Windows will attempt to repair any errors that may have been causing the automatic repair loop. If the issue persists, you may need to try other troubleshooting methods.
Remember, restarting your computer is a basic but effective way to address many software-related issues. If you encounter any further problems, consult our troubleshooting guide or seek assistance from our support forums.
Related: Windows 10, error, backup, troubleshooting, software AOMEI, system files, data recovery software, safe mode, black screen, boot loop.
Checking Boot Priority in BIOS to Resolve the Loop
To check the boot priority in BIOS and resolve the loop, follow these steps:
1. Restart your computer and press the DEL or F2 key (depending on your system) to enter BIOS settings.
2. Look for the “Boot” or “Boot Priority” section in the BIOS menu.
3. Ensure that the hard drive or SSD is set as the first boot device.
4. If the boot priority is already correct, try changing it to another device, such as a USB drive, and then change it back to the hard drive or SSD.
5. Save the changes and exit the BIOS settings.
6. Restart your computer and check if the automatic repair loop is resolved.
By adjusting the boot priority in BIOS, you can ensure that the computer boots from the correct device, which can help resolve the loop issue. If you’re still experiencing the problem, it may be necessary to seek further assistance from a professional or consult online forums for additional troubleshooting steps.
Disabling Early Launch Anti-Malware Protection
To disable Early Launch Anti-Malware Protection in Windows 8 and fix a stuck automatic repair loop, you can follow these steps:
1. Start your computer and press the F8 key repeatedly until the Advanced Boot Options menu appears.
2. Use the arrow keys to select “Disable early launch anti-malware protection” and press Enter.
3. Windows will now start without early launch anti-malware protection enabled.
4. If the automatic repair loop issue persists, you can try other troubleshooting methods or seek further assistance from forums or support articles.
5. It’s important to note that disabling this protection may leave your system vulnerable to certain types of malware, so use this solution cautiously.
Remember, these instructions are specific to Windows 8 and may not apply to other operating systems or devices. Always make sure to backup important files before attempting any system changes.
Replacing Bad Drivers to Fix the Loop
- Identify the problematic driver causing the automatic repair loop.
- Access the Advanced Startup Options by restarting your Windows 8 device.
- Select the Troubleshoot option from the Advanced Startup menu.
- Choose Advanced options to proceed.

- Click on the Startup Settings option.
- Restart your device once again.
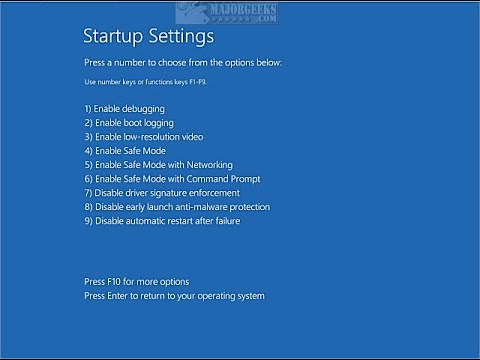
- Press the F7 key to enter the Safe Mode with Networking.
- Open the Device Manager by right-clicking on the Start button and selecting Device Manager from the menu.
- Expand the categories and check for any devices with a yellow exclamation mark.
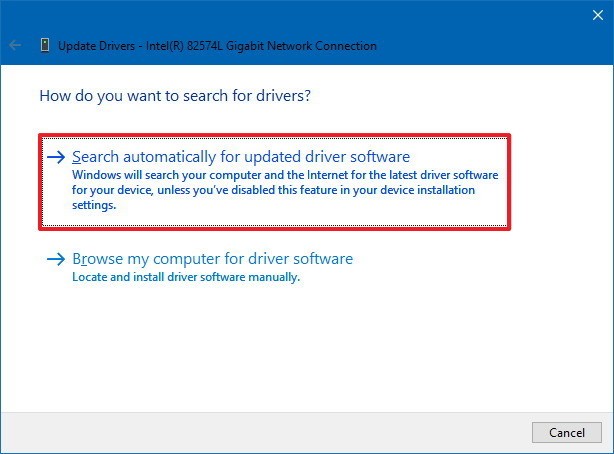
- Right-click on the problematic driver and select Update driver.
- Choose the option to search automatically for updated driver software.
- Follow the on-screen instructions to complete the driver update process.
- Restart your device to apply the driver updates.
- Check if the automatic repair loop issue has been resolved.

Resolving the Loop Using Command Prompt
If you find your Windows 8 stuck in an automatic repair loop, there is a way to resolve this issue using Command Prompt. Follow these steps to fix the problem:
1. Boot your computer and press the Shift key while clicking on the Restart option. This will take you to the Advanced Startup Options.
2. In the Advanced Startup Options, select Troubleshoot and then choose Advanced Options.
3. From the Advanced Options menu, click on Command Prompt.
4. In the Command Prompt, you can use various commands to resolve the loop. For example, you can use the sfc /scannow command to scan and repair system files.
5. You can also try running the bootrec command to fix the boot configuration.
6. Once you have executed the necessary commands, restart your computer and check if the loop has been resolved.
By using Command Prompt, you can troubleshoot and fix the Windows 8 automatic repair loop without the need for user intervention or additional software.
Deleting Corrupted Files to Resolve the Loop
- Boot the computer into Safe Mode by restarting the computer and repeatedly pressing the F8 key before the Windows logo appears.
- This will bring up the Advanced Boot Options menu.
- Select the “Safe Mode” option using the arrow keys and press Enter.
- The computer will now boot into Safe Mode.
- Once in Safe Mode, open the Command Prompt by pressing the Windows key + X and selecting “Command Prompt (Admin)” from the menu.
- This will open the Command Prompt with administrative privileges.
- In the Command Prompt, type the following command and press Enter: sfc /scannow
- This command will scan the system for any corrupted files and attempt to repair them.
- Wait for the scan to complete.
- After the scan is complete, type the following command and press Enter: dism /online /cleanup-image /restorehealth
- This command will repair any corrupted system files using Windows Update.
- Wait for the process to finish.
- Once the process is complete, restart the computer and check if the automatic repair loop is resolved.
Rebuilding BCD and Running CHKDSK to Fix the Loop
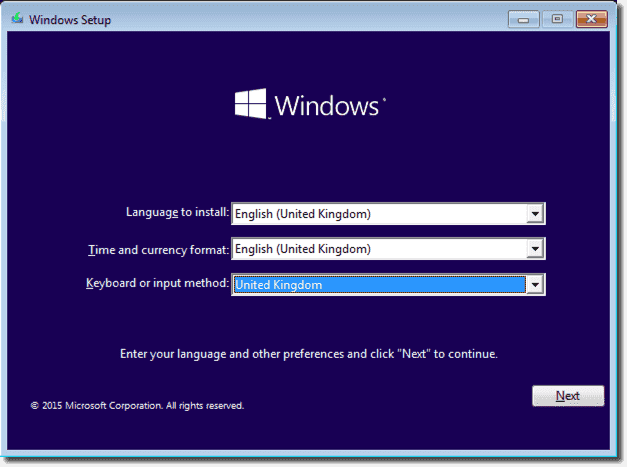
To fix a Windows 8 stuck in automatic repair loop, you can try rebuilding BCD and running CHKDSK. Follow these steps:
1. Boot your computer using a Windows installation media.
2. On the Windows Setup window, click “Next” and then select “Repair your computer.”
3. Choose “Troubleshoot” > “Advanced options” > “Command Prompt.”
4. In the Command Prompt, type “bootrec /rebuildbcd” and press Enter. This will scan for Windows installations and add them to the BCD.
5. Next, run “chkdsk /f” to check and fix any file system errors on your drive.
6. Once the process is complete, restart your computer and see if the issue is resolved.
Note: If you don’t have a Windows installation media, you can create a bootable USB using software like AOMEI or use the recovery feature provided by your device manufacturer.
Remember, this solution may not work for all cases, and there could be other reasons for the automatic repair loop, such as hardware issues. If the problem persists, it’s recommended to seek further assistance from a technical support forum or consult an expert.
Restoring Windows Registry or Registry Settings
To restore Windows Registry or Registry Settings on Windows 8 when stuck in an Automatic Repair Loop, you can follow these steps:
1. Boot into Safe Mode: Restart your computer and repeatedly press the F8 key until the Advanced Boot Options menu appears. Select “Safe Mode” and press Enter.
2. Launch the Registry Editor: Press the Windows key + R to open the Run dialog box. Type “regedit” and press Enter.
3. Backup the Registry: Before making any changes, it’s crucial to back up the Registry. In the Registry Editor, click on “File” and select “Export.” Choose a location to save the backup file.
4. Restore Registry Settings: In the Registry Editor, navigate to the location of the registry key or value that you want to restore. Right-click on it and select “Delete.” Then, import the backup file you created earlier by clicking on “File” and choosing “Import.”
5. Restart your computer: After restoring the Registry, restart your computer and check if the Automatic Repair Loop issue has been resolved.
If you’re still experiencing problems, consider seeking assistance from a Microsoft support forum or contacting their customer support.
Ways to Fix Automatic Repair Not Working in Windows 10/8
If you’re experiencing the “Automatic Repair not working” issue on your Windows 10/8 device, here are some ways to fix it.
1. Disable Automatic Repair: Restart your computer and repeatedly press the F8 key to enter the Advanced Boot Options menu. Select “Disable automatic restart on system failure” to prevent the automatic repair from launching.
2. Use System Restore: Restart your computer and press the F8 key to enter the Advanced Boot Options menu. Select “Safe Mode with Command Prompt” and type “rstrui.exe” to launch System Restore. Follow the on-screen instructions to restore your computer to a previous working state.
3. Run Windows Startup Repair: Insert your Windows installation disc or USB and restart your computer. Press any key to boot from the installation media, then select “Repair your computer” > “Troubleshoot” > “Advanced options” > “Startup Repair”.
4. Use AOMEI Partition Assistant: Download and install the AOMEI Partition Assistant software. Launch the software and select the partition that contains your Windows operating system. Right-click on it and select “Rebuild MBR”. Follow the on-screen instructions to complete the process.
Remember, these are just a few possible solutions to fix the “Automatic Repair not working” issue. The cause of the problem may vary, so it’s important to try different methods until you find the one that works for you.
Repairing MBR and Rebuilding BCD
To fix a Windows 8 stuck in an automatic repair loop, you can try repairing the Master Boot Record (MBR) and rebuilding the Boot Configuration Data (BCD).
First, access the Advanced Startup Options by restarting your computer and pressing the F8 or Shift+F8 key repeatedly during startup.
Next, select “Repair your computer” and navigate to Troubleshoot > Advanced Options > Command Prompt.
In the Command Prompt, type “bootrec /fixmbr” and press Enter to repair the MBR. Then, type “bootrec /rebuildbcd” and press Enter to rebuild the BCD.
After the process is complete, restart your computer and check if the issue is resolved.
Note that these steps may vary depending on the device and operating system, so it’s important to follow the specific instructions for your system.
Additional Methods to Fix the Windows Automatic Repair Loop
- Perform a System Restore: Use the System Restore feature to roll back your computer to a previous working state.
- Disable Automatic Startup Repair: Stop Windows from automatically launching the repair process during boot up.
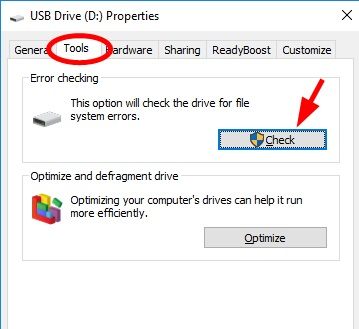
- Check for Hard Drive Errors: Run a disk check utility to identify and fix any errors on your hard drive.
- Run a Virus Scan: Use a reliable antivirus program to scan your system for any malware or viruses that may be causing the issue.
- Repair Windows Startup Files: Use the Command Prompt to repair damaged or corrupted system files related to startup.
- Reset BIOS Settings: Reset the BIOS settings to default to ensure no incorrect configurations are causing the loop.
- Perform a Clean Windows Installation: As a last resort, reinstall Windows to resolve any persistent issues causing the automatic repair loop.