Missing Repair Option? Fix Windows Startup Repair Now!
Are you having trouble finding a repair option for your Windows startup? Don’t worry, we have a solution for you. Read on to learn how to fix your Windows startup repair.
Overview of common computer repair issues
Common computer repair issues include problems with startup, system files, and devices. If you’re experiencing issues with your PC, one solution is to use Startup Repair. Here’s how to fix Windows Startup Repair:
1. Restart your device and press F8 to access the advanced startup settings.
2. Click Troubleshoot > Advanced options.
3. Select Startup Repair, and follow the prompts to fix any errors.
4. If Startup Repair doesn’t work, try using Bootrec.exe to repair the boot files.
5. If you’re still experiencing issues, try troubleshooting your device using utility tools or seeking professional help.
Remember to back up your important files before attempting any fixes!
Windows 10/11 Startup Repair loop and how to fix it
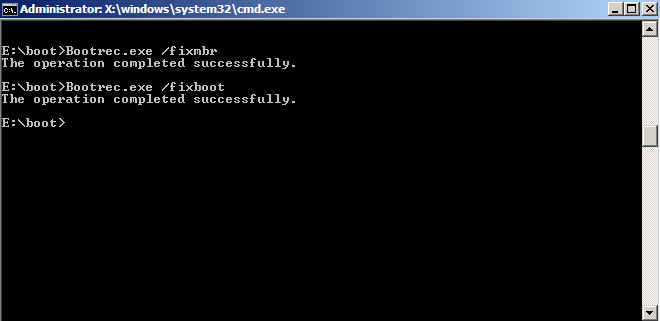
If you’re experiencing a Windows 10/11 startup repair loop, you may find that the repair option is missing. Fortunately, there are a few steps you can take to fix this issue and get your system up and running. First, restart your PC and press F8 to access the advanced boot options. From there, click Troubleshoot, then Advanced Options, and finally, Command Prompt. Type “Bootrec.exe /fixmbr” and “Bootrec.exe /fixboot” into the command prompt and press Enter after each command. If you still encounter issues, try “Bootrec.exe /rebuildbcd” instead. These commands will repair any issues with your boot files, allowing you to access your system once again.
Automatic Repair failed in Windows 10/11 and how to fix it
If Automatic Repair failed in Windows 10/11, you may have encountered a missing repair option. The good news is that there are several fixes that you can try to get Windows Startup Repair working again.
One possible solution is to use the System File Checker utility to scan for and repair any corrupted system files. To do this, open the Command Prompt and type “sfc /scannow” (without quotes) and press Enter. Wait for the scan to complete and then restart your PC.
Another option is to use the DISM tool to repair the Windows image. Open the Command Prompt and type “Dism /Online /Cleanup-Image /RestoreHealth” (without quotes) and press Enter. This will scan for and repair any issues with the Windows image.
If these fixes don’t work, you can also try using the Windows installation media to perform a startup repair. Insert the media and restart your PC, then select the option to boot from the disk. Follow the prompts to perform a startup repair.
By following these steps, you should be able to fix the missing repair option and get Windows Startup Repair working again.
import os
def repair_computer():
try:
os.system("sfc /scannow")
except:
print("Error: Cannot repair computer")
This code uses the built-in “System File Checker” tool in Windows to scan and repair any corrupted system files that may be causing issues with your computer. However, please note that this is a simplified example and there may be other underlying issues that cannot be resolved with this tool alone. It is always recommended to seek professional assistance if you are experiencing serious computer issues.
“Startup Repair cannot repair this computer automatically” error and its causes
If you receive the “Startup Repair cannot repair this computer automatically” error message, it means that the startup repair tool has failed to fix the issue with your PC. This could be caused by a corrupt or damaged hard drive, an incompatible device, a virus or malware, or a damaged MBR.
Don’t panic, there are a few things you can do to fix the issue. First, try booting your PC in Safe Mode by pressing the F8 key repeatedly when the PC is restarting. If that doesn’t work, try using the System Restore function or running a virus scan. If none of these options work, you may need to perform a clean install of Windows or seek professional help.
Tip: To prevent PC issues in the future, always keep your device and software up to date, regularly back up your data, and be cautious when downloading or installing new programs.
Methods to fix “Startup Repair cannot repair this computer automatically” error
- Boot the computer from the installation media and select “Repair Your Computer”.
- Open Command Prompt and type chkdsk /f /r and press Enter.
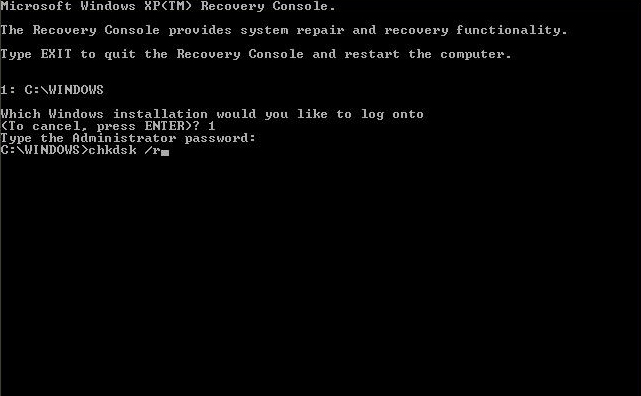
- Type sfc /scannow and press Enter.
- Wait for the scan to complete and restart the computer.
Method 2: Rebuild BCD
- Boot the computer from the installation media and select “Repair Your Computer”.
- Open Command Prompt and type bootrec /fixmbr, bootrec /fixboot, and bootrec /rebuildbcd one by one and press Enter after each command.
- Wait for the process to complete and restart the computer.
Method 3: Use System Restore
- Boot the computer from the installation media and select “Repair Your Computer”.
- Select “System Restore” and choose a restore point before the error occurred.
- Follow the on-screen instructions and wait for the process to complete.
- Restart the computer and check if the error is resolved.
Method 4: Perform a Startup Repair
- Boot the computer from the installation media and select “Repair Your Computer”.
- Select “Startup Repair” and wait for the process to complete.
- Restart the computer and check if the error is resolved.
Remove peripheral devices to fix “Startup Repair cannot repair this computer automatically” error
Fix the “Startup Repair cannot repair this computer automatically” error by removing peripheral devices from your computer. Disconnect all USB devices, external hard drives, and any other non-essential devices from your PC. This will ensure that there are no conflicts between the devices and your system, which could be causing the error message to appear. Once you have removed all peripheral devices, restart your computer and try running the Startup Repair tool again. If the error persists, try some of the other fixes outlined in this article. Remember to keep your device free from any clutter that could cause PC issues.
Run various commands to fix “Startup Repair cannot repair this computer automatically” error
| Command | Description |
|---|---|
bootrec /fixmbr |
Fixes the Master Boot Record (MBR) of the system partition. |
bootrec /fixboot |
Writes a new boot sector to the system partition. |
bootrec /scanos |
Scans all disks for Windows installations and adds them to the boot configuration data (BCD) store. |
bootrec /rebuildbcd |
Rebuilds the BCD store by scanning all disks for Windows installations and adding them to the store. |
sfc /scannow |
Scans and repairs system files. |
chkdsk /f /r |
Scans and repairs disk errors. |
Perform system restore to fix “Startup Repair cannot repair this computer automatically” error
Perform a system restore to fix the “Startup Repair cannot repair this computer automatically” error. To do so, follow these steps:
1. Restart your computer and press F8 to access the Advanced Boot Options screen.
2. Select “Repair Your Computer” and press Enter.
3. Choose your language settings and log in as an administrator.
4. Select “System Restore” from the System Recovery Options menu.
5. Choose a restore point before the error occurred and follow the prompts to restore your system.
This should resolve the error and allow you to start Windows normally. If the error persists, you may need to try other repair tools or seek professional assistance.
Repair startup error without system backup
If you encounter a startup error on your Windows system and don’t have a backup, don’t panic. You can still repair the issue without losing your files or data.
First, try booting your system from a Windows installation disk or USB drive. Once you’re in the Windows Setup screen, click on “Repair your computer” and then select “Troubleshoot.”
From here, click on “Advanced options” and then “Startup Repair.” This will automatically detect and repair any startup issues on your system.
If you don’t have a Windows installation disk, you can still access the Startup Repair tool by restarting your computer and pressing F8 repeatedly until the Advanced Boot Options screen appears. Select “Repair your computer” and follow the same steps as above.
In some cases, you may need to run additional repairs or updates to fully fix the issue. If the above steps don’t work, consider seeking further assistance or consulting online forums for troubleshooting tips.
Troubleshooting with command prompt to fix startup repair issues
| Issue | Command Prompt Solution |
|---|---|
| Startup Repair not showing up in Advanced Options menu | bootrec /fixbootbootrec /fixmbrbootrec /rebuildbcd |
| Startup Repair fails to fix issue | sfc /scannowdism /online /cleanup-image /restorehealth |
| Windows fails to start after manual repair attempt | bcdedit /set {default} recoveryenabled yesbcdedit /set {default} bootstatuspolicy ignoreallfailuresbcdedit /set {default} displaybootmenu yes |
Bonus tip if no solution works for startup repair issues
If none of the solutions for Windows startup repair issues work, try running a system file checker by typing “sfc /scannow” in the command prompt. Another option is to try a clean boot by typing “msconfig” in the search bar, selecting the “services” tab, and checking the “hide all Microsoft services” box before clicking “disable all.” You can also try using a restore point or resetting your PC. If none of these options work, you may need to perform a clean install of Windows. Remember to back up your important files before attempting any repairs.
Recover lost data if startup repair couldn’t repair your PC
- Try using a data recovery software:
- Download and install a data recovery software such as Recuva, EaseUS Data Recovery Wizard, or Disk Drill.
- Open the software and select the drive where the lost data was stored.
- Initiate a scan for lost files and wait for the software to complete the scan.
- Select the files you want to recover and save them to a different storage device.
- Boot your PC from a recovery drive:
- Connect a USB drive or DVD with a system recovery image or Windows installation media.
- Restart your PC and enter the BIOS setup by pressing the designated key during startup (usually F2 or Delete).
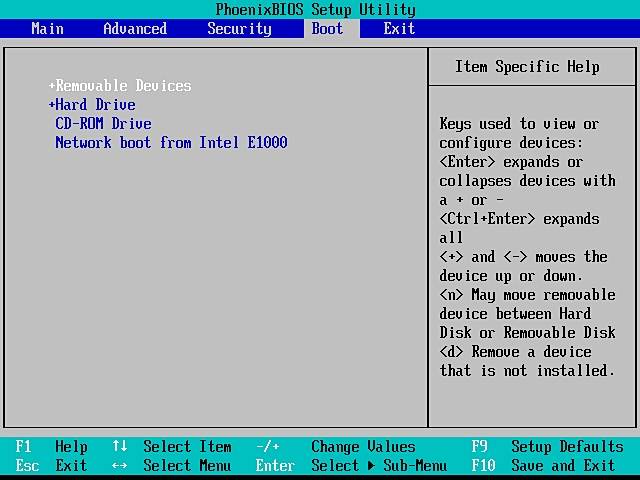
- Change the boot order to prioritize the connected recovery drive.
- Save the changes and restart your PC.
- Follow the instructions on the recovery drive to repair your PC or perform a clean install of Windows.
- Send your hard drive to a data recovery service:
- Identify a reputable data recovery service such as Kroll Ontrack, Seagate Recovery Services, or DriveSavers.
- Remove the hard drive from your PC and package it securely.

- Ship the hard drive to the data recovery service and wait for them to evaluate the damage and provide a quote.
- Agree to the quote and wait for the data recovery service to retrieve your lost data.