Windows.old File Recovery and Deletion Guide
Welcome to the comprehensive guide on recovering and deleting the Windows.old file!
Retrieving and Managing the Windows.old Folder
If you recently upgraded your operating system and noticed the presence of a “Windows.old” folder, don’t worry – it’s completely normal. This folder contains files and data from your previous Windows installation and can be useful if you need to retrieve any lost or deleted files.
To access the Windows.old folder, follow these steps:
1. Open File Explorer by double-clicking on the folder icon on your desktop or by pressing the Windows key + E.
2. Navigate to the C: drive, where your Windows installation is located.
3. Look for the Windows.old folder and open it.
Inside the Windows.old folder, you will find various subfolders, including Users, which contains your personal files and documents from the previous installation. You can cut, copy, and paste these files to your desired location on your current Windows installation.
Once you have retrieved any necessary files, it’s recommended to delete the Windows.old folder to free up disk space. Here’s how:
1. Select the Windows.old folder and press the Delete key on your keyboard.
2. Windows will prompt you for permission to delete the folder. Click Yes to confirm.
It’s important to note that once you delete the Windows.old folder, you won’t be able to recover any files stored within it. So, make sure you have retrieved everything you need before proceeding with the deletion.
Deleting the Windows.old Folder
1. Open File Explorer by clicking on the folder icon in the taskbar or pressing the Windows key + E on your keyboard.
2. Navigate to the C: drive, where the Windows.old folder is located.
3. Right-click on the Windows.old folder and select Delete.
4. A confirmation pop-up window will appear. Click Yes to permanently delete the folder.
5. Depending on the size of the folder, the deletion process may take some time. Do not interrupt the process.
6. Once the deletion is complete, you will have successfully removed the Windows.old folder from your computer.
It’s important to note that once deleted, you won’t be able to recover any files or settings stored in the Windows.old folder. If you need to recover any data from the folder, it’s recommended to do so before deleting it.
Removing the Windows.old Folder in Settings and File Explorer
To remove the Windows.old folder in Settings, follow these steps:
1. Open the Start menu and click on the Settings icon.
2. In the Settings window, click on “System” and then select “Storage” from the left-hand menu.
3. Under the “Local Disk (C:)” section, click on “Temporary files”.
4. Scroll down and find the “Previous version of Windows” option.
5. Click on “Delete previous versions” and confirm your action when prompted.
To remove the Windows.old folder in File Explorer, follow these steps:
1. Open File Explorer by double-clicking on the folder icon on your taskbar or by pressing the Windows key + E.
2. In the File Explorer window, locate the “This PC” or “My Computer” option on the left-hand side and click on it.
3. Right-click on the “Local Disk (C:)” and select “Properties” from the context menu.
4. In the Properties window, click on the “Disk Cleanup” button.
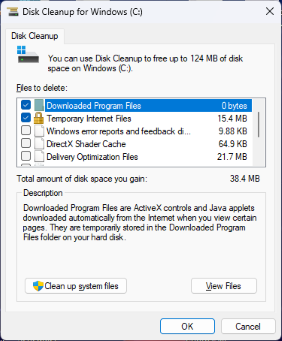
5. Wait for the Disk Cleanup utility to calculate the amount of space you can free up.
6. Check the box next to “Previous Windows installation(s)” and any other options you want to delete.
7. Click on “OK” and then “Delete Files” to remove the Windows.old folder.
python

import os

import shutil
def delete_windows_old_files(folder_path):
if not os.path.exists(folder_path):
print("Windows old folder doesn't exist.")
return
try:
shutil.rmtree(folder_path)
print("Windows old files deleted successfully.")
except OSError as e:
print(f"Error: {e.filename} - {e.strerror}.")
# Example usage
windows_old_folder = "C:\Windows.old"
delete_windows_old_files(windows_old_folder)
In the above code, we define a function `delete_windows_old_files` that takes the `folder_path` as a parameter. It checks if the specified folder exists and attempts to delete it using the `shutil.rmtree` function, which recursively removes the folder and its contents. If an error occurs during deletion, it prints an appropriate error message.
Additional Tips for Freeing Up C Drive Space
- Open the Start menu by clicking on the Windows icon in the bottom left corner of the screen.
- Type “disk cleanup” in the search bar and select Disk Cleanup from the search results.
- In the Drives list, select the C drive that you want to free up space on.
- Click on the OK button to launch the Disk Cleanup tool.
- Wait for the tool to calculate the amount of space that can be freed up.
- In the Files to delete list, select the types of files you want to delete (e.g., Temporary files, Recycle Bin, etc.).
- Click on the OK button to start the cleanup process.
- Confirm the deletion by clicking on the Delete Files button.
- Wait for the tool to complete the cleanup process.
Repair Method 2: Uninstall Unnecessary Programs
- Open the Start menu by clicking on the Windows icon in the bottom left corner of the screen.
- Select Settings (gear icon) from the Start menu.
- In the Settings window, click on Apps or Apps & Features.
- In the list of installed apps, select the program you want to uninstall.
- Click on the Uninstall button and follow the on-screen prompts to complete the uninstallation process.
- Repeat steps 4 and 5 for each unnecessary program you want to remove.
Repair Method 3: Move or Delete Large Files
- Open File Explorer by clicking on the folder icon in the taskbar or by pressing Win+E.
- Navigate to the C drive on the left sidebar.
- Sort the files by size by clicking on the Size column header.
- Identify and select the large files or folders that you want to move or delete.
- To move the selected files, right-click on them and select Cut. Then, navigate to a different drive or folder and right-click to select Paste.
- To delete the selected files, right-click on them and select Delete. Confirm the deletion in the prompt that appears.
- Repeat steps 4-6 as needed to free up space on the C drive.