Solutions to Fix 99% CPU Usage in Windows 10
Having your CPU usage constantly at 99% can be frustrating. In this article, we explore effective solutions to fix this issue in Windows 10.
Reasons for High CPU Usage in Windows
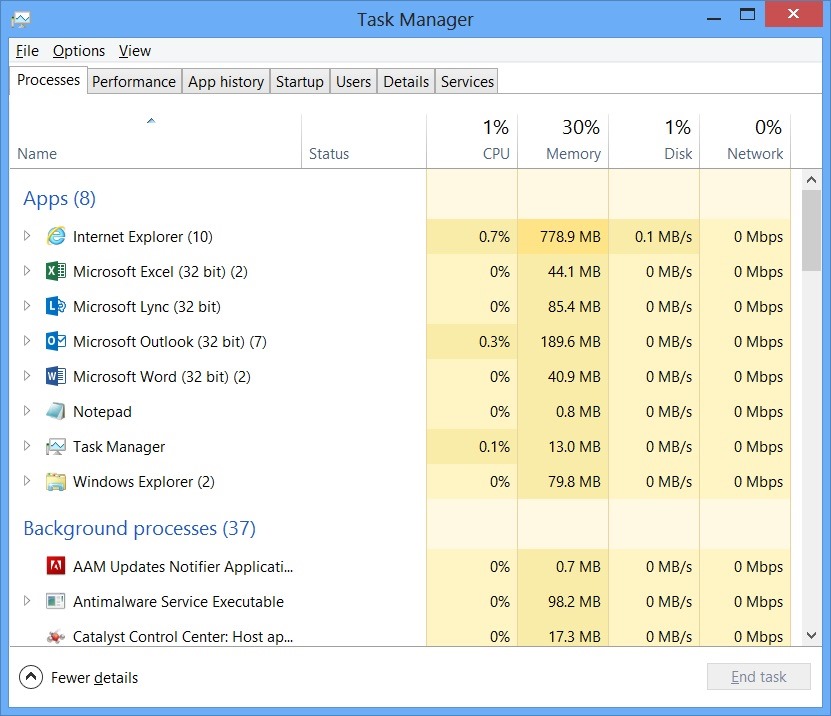
One possible solution is to identify and terminate any unnecessary processes using the Task Manager. To do this, press the Ctrl + Shift + Esc keys to open the Task Manager, then go to the Processes tab. Look for any processes that are using a significant amount of CPU resources and end them by right-clicking on them and selecting “End Task.”
Another potential cause of high CPU usage is malware or viruses. Running a full scan with a reliable antivirus software, such as Microsoft Defender Antivirus, can help identify and remove any malicious programs.
It’s also worth checking for any software bugs or conflicts that may be causing high CPU usage. Updating your operating system and application software to the latest versions can often resolve these issues.
In some cases, Windows Search indexing can contribute to high CPU usage. You can disable this feature temporarily by right-clicking on the Start button, selecting “Search,” and then choosing “Indexing Options.” From there, you can modify the indexing settings or pause indexing altogether.
Basic Fixes for High CPU Usage
- Update your operating system: Ensure that your Windows 10 is running on the latest updates and patches.
- Check for malware or viruses: Run a comprehensive scan using reliable antivirus software.
- Disable unnecessary startup programs: Open Task Manager, go to the Startup tab, and disable any programs that are not essential.
- Manage background processes: Use Task Manager to identify and close any resource-intensive processes running in the background.
- Adjust power options: Go to Power Options in the Control Panel and select a power plan that balances performance and energy efficiency.
- Update device drivers: Visit the manufacturer’s website or use a driver updater tool to download and install the latest drivers for your hardware.
- Disable Windows Search Indexing: Open Services in the Control Panel, locate “Windows Search,” and set it to “Disabled.”
- Adjust system settings: Right-click on “This PC” or “My Computer,” select Properties, go to the Advanced system settings, and under the Performance tab, choose “Adjust for best performance” or manually disable specific visual effects.

- Perform a clean boot: Temporarily disable all non-Microsoft services and startup programs to determine if a third-party application is causing the high CPU usage.
Disable SysMain (formerly known as Superfetch)
1. Open the Task Manager by pressing Ctrl + Shift + Esc.
2. Go to the “Services” tab.
3. Scroll down and locate “SysMain” in the list of services.
4. Right-click on “SysMain” and select “Properties” from the context menu.
5. In the “SysMain Properties” window, go to the “General” tab.
6. Change the “Startup type” to “Disabled” and click on “Apply” and then “OK”.
7. Restart your computer for the changes to take effect.
Disabling SysMain can help resolve high CPU usage issues in Windows 10. SysMain is a background process that preloads frequently accessed data into memory, but it can sometimes consume excessive CPU resources. By disabling it, you can alleviate the strain on your CPU and improve overall system performance.
Remember that while disabling SysMain can be beneficial, it may impact the performance of certain applications that rely on preloading data. If you encounter any issues after disabling SysMain, you can always re-enable it by following the same steps and selecting “Automatic” as the startup type.
Restart the WMI Provider Host
![]()
1. Open Task Manager by pressing Ctrl + Shift + Esc on your keyboard.
2. In the Task Manager window, go to the “Processes” or “Details” tab.
3. Look for the process named “WmiPrvSE.exe” in the list.
4. Right-click on “WmiPrvSE.exe” and select “End task” from the context menu.
5. Confirm the action if prompted.
6. After ending the process, go to the “Services” tab in Task Manager.
7. Scroll down and find “WMI Performance Adapter” in the list of services.
8. Right-click on “WMI Performance Adapter” and select “Restart” from the context menu.
9. Wait for the service to restart and check if the CPU usage has decreased.
By restarting the WMI Provider Host, you can often resolve high CPU usage issues in Windows 10.
Adjust Your Power Plan
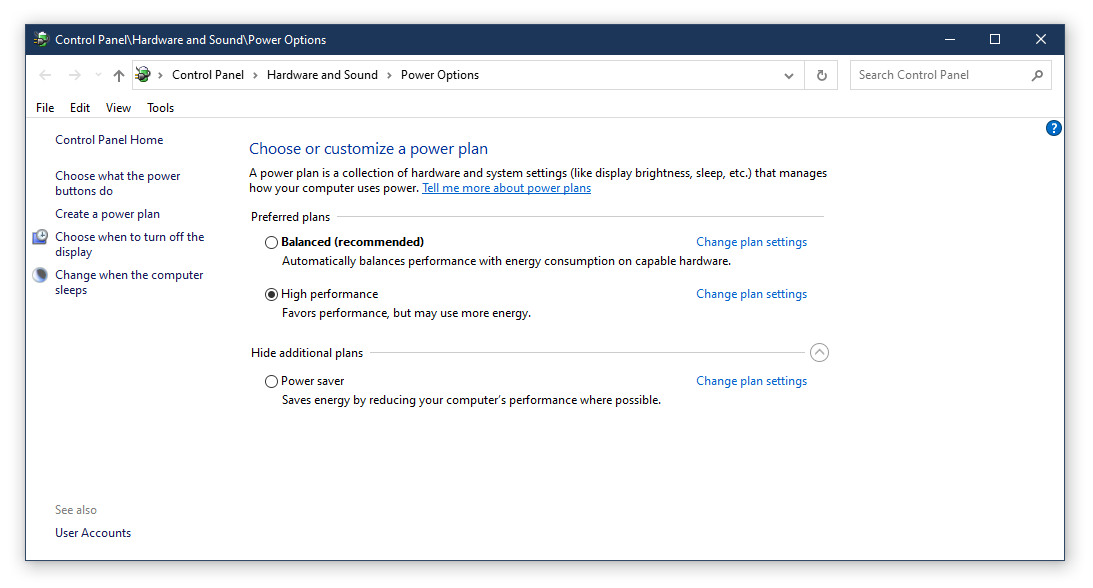
1. Open the Power Options menu by right-clicking on the battery icon in the taskbar and selecting “Power Options”. Alternatively, you can search for “Power Options” in the Windows search bar.
2. In the Power Options menu, you will see different power plans available. Select the one that is currently active by clicking on it.
3. Click on “Change plan settings” next to the selected power plan.
4. In the next window, click on “Change advanced power settings”.
5. A new window will open with various power options. Look for “Processor power management” and click on the “+” sign next to it to expand the options.
6. Here, you will find two settings: “Minimum processor state” and “Maximum processor state”. Adjust these settings according to your preferences. For example, you can decrease the maximum processor state to reduce CPU usage.
7. Click “Apply” and then “OK” to save the changes.
By adjusting your power plan settings, you can optimize your CPU usage and potentially resolve any high CPU usage issues you may be experiencing.
Check Your Power Supply
1. Shut down your computer completely.
2. Unplug the power cord from the back of your computer.
3. Open your computer case and locate the power supply unit (PSU).
4. Check all the connections to ensure they are secure.
5. Check for any visible signs of damage or overheating on the PSU.
6. If everything looks fine, you can use a multimeter to test the voltage output of the PSU. Ensure you follow proper safety precautions when working with electricity.
7. If the voltage readings are within the acceptable range, your power supply is likely not the cause of the high CPU usage.
If you suspect that your power supply is faulty or not providing enough power, consider replacing it with a new one to see if it resolves the issue.
Fix 100% CPU Usage in Games (Warzone and Apex Legends)
If you’re experiencing high CPU usage while playing games like Warzone and Apex Legends on Windows 10, there are a few solutions you can try to fix the issue.
1. Update your graphics drivers: Outdated or faulty graphics drivers can cause high CPU usage during gaming. Visit your graphics card manufacturer’s website and download the latest drivers for your specific model.
2. Close unnecessary background processes: Open Task Manager by pressing Ctrl + Shift + Esc and go to the “Processes” tab. Look for any processes that are using a significant amount of CPU resources and end them.
3. Disable unnecessary startup programs: Press Ctrl + Shift + Esc to open Task Manager and go to the “Startup” tab. Disable any programs that you don’t need to start automatically with your computer.
4. Check for malware: Use a reputable antivirus program like Microsoft Defender Antivirus to scan your system for any malware or viruses that may be causing the high CPU usage.
5. Adjust in-game settings: Lowering graphic settings and disabling unnecessary features like shadows or anti-aliasing can reduce the CPU load during gameplay.
6. Close unnecessary applications: Before launching your game, close any unnecessary applications running in the background to free up CPU resources.
Disable Third-Party Antivirus Software
If you are experiencing high CPU usage on your Windows 10 computer, one potential solution is to disable any third-party antivirus software that you have installed. While antivirus software is important for protecting your computer from viruses and malware, it can sometimes consume a significant amount of CPU resources, leading to sluggish performance.
To disable third-party antivirus software, follow these steps:
1. Open the Task Manager by pressing the Ctrl, Shift, and Esc keys simultaneously.
2. In the Task Manager window, click on the “Processes” tab.
3. Look for the antivirus software process in the list of running processes. It may be named after the antivirus software you have installed.
4. Right-click on the antivirus software process and select “End Task” or “End Process.”
5. If prompted, confirm that you want to end the process.
Disabling the antivirus software temporarily should help reduce CPU usage and improve the performance of your computer.
Disable Automatic Startup Applications

- Identify unnecessary startup applications
- Access Task Manager by pressing Ctrl + Shift + Esc
- Click on the Startup tab
- Disable applications you don’t need to start automatically
- Right-click on the application and select Disable
- Restart your computer to apply the changes
Turn Windows Notification Settings Off
To turn off Windows notification settings in Windows 10 and potentially fix high CPU usage, follow these steps:
1. Press the Windows key on your keyboard, or click the Windows icon in the bottom left corner of your screen, to open the Start menu.
2. Type “Settings” and click on the Settings app from the search results.
3. In the Settings window, click on “System” and then select “Notifications & actions” from the left-hand menu.
4. To disable all notifications, toggle off the “Get notifications from apps and other senders” option at the top of the page.
5. If you want to customize which apps can send notifications, scroll down and manage the settings for individual apps using the toggles provided.
By turning off Windows notification settings, you can reduce the background processes and potentially alleviate high CPU usage. Remember to regularly check for software updates and run antivirus scans to ensure a smooth and secure computing experience.
Note: These instructions are specifically for Windows 10. The steps may vary slightly for other versions of Windows.