Chrome Password Saving Issue Fix
Unlocking the secret to seamless browsing, our article delves into the realm of Chrome password saving issues and presents an innovative fix that will leave you worry-free.
Reasons why Chrome stops remembering passwords
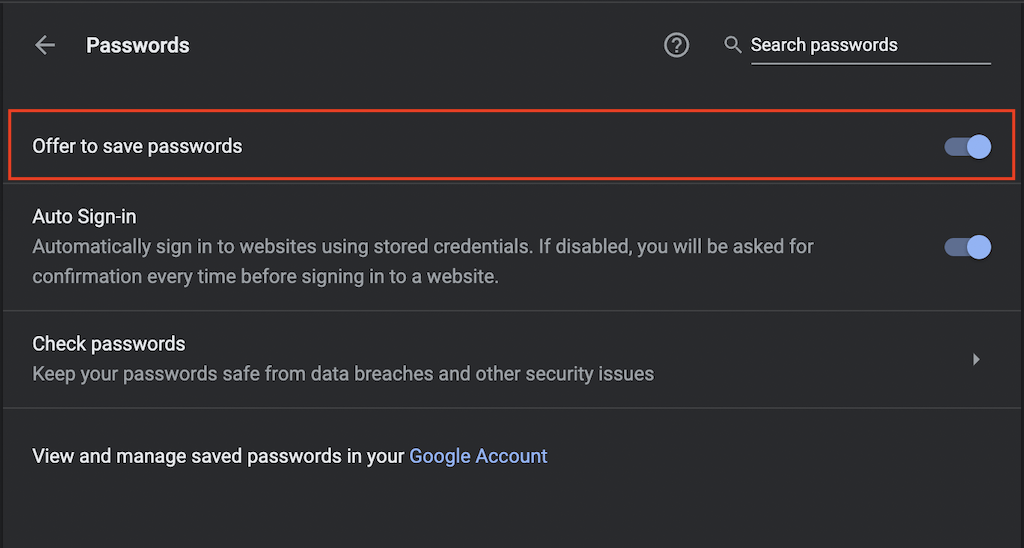
1. Browser settings: Check if the password saving feature is enabled in Google Chrome’s Settings. Go to Settings > Autofill > Passwords and make sure the toggle is on.
2. Site-specific issues: Some websites may have their own auto sign-in feature that conflicts with Chrome’s password saving capability. To fix this, click the key icon in the username field and select “Never” from the drop-down list.
3. Password manager conflicts: If you are using password management tools like Dashlane, they might interfere with Chrome’s password saving. Disable or adjust the settings in your password manager to resolve the issue.
4. Glitches and bugs: Chrome sometimes experiences temporary glitches or bugs that prevent it from remembering passwords. Try restarting your device and updating Chrome to the latest version to fix any possible bugs.
5. Clear cache and cookies: Clearing your browsing data, including cookies and cache files, can help resolve any temporary issues that may be causing Chrome to stop remembering passwords. Go to Settings > Privacy and Security > Clear Browsing Data, and select the relevant options.
Remember, Chrome’s password saving feature is designed for your convenience, but occasional hiccups can occur.
Logging in and out of your Google account
If you’re experiencing issues with Google Chrome not saving your login credentials, here’s a quick fix:
1. Open Google Chrome and go to Settings.
2. Scroll down and click on Advanced.
3. Under the Autofill section, click on Passwords.
4. Toggle on the Offer to save passwords option if it’s not already enabled.
5. Scroll down to the Never Saved section and click on the key icon next to the website that’s not remembering your credentials.
6. In the drop-down list, click on Remove to delete any saved passwords for that site.
7. Go back to the site and login again, making sure to save your credentials when prompted.
This should fix the issue and allow Google Chrome to properly save and autofill your login details.
Using a password manager
If you’re experiencing issues with Chrome not saving your passwords, there are a few steps you can take to fix the problem.
First, make sure you’re using the latest version of Chrome browser. Updates often include fixes for known issues.
Next, check your browser settings. Open Chrome and click on the three dots in the top right corner. Select “Settings” from the dropdown menu. Scroll down and click on “Advanced” to expand the options. Under “Passwords and forms,” click on “Autofill settings.”
In the Autofill settings, make sure the “Autofill passwords” feature is turned on. If it’s already on, try toggling it off and then back on again.
If the issue persists, it may be related to your Google account. Make sure you’re signed in with the correct account and that your username is spelled correctly.
If none of these steps fix the problem, you may want to consider using a password manager like Dashlane. These tools can securely store and autofill your passwords across multiple devices, providing convenience and ease of use.
Remember to always prioritize the security of your accounts and personal information.
python

from selenium import webdriver
def check_chrome_passwords():
# Set the path to the Chrome driver executable
driver_path = '/path/to/chromedriver'
# Create a Chrome WebDriver instance
driver = webdriver.Chrome(executable_path=driver_path)
# Open Chrome settings
driver.get('chrome://settings/')
# Navigate to the "Passwords" section within settings
driver.get('chrome://settings/passwords')
# Find the toggle switch element for "Offer to save passwords"
toggle_switch = driver.find_element_by_css_selector('input[type="checkbox"]')
# Check if the toggle switch is enabled or disabled
if toggle_switch.is_selected():
print("Chrome is remembering passwords.")
else:
print("Chrome has stopped remembering passwords.")
# Close the Chrome WebDriver
driver.quit()
# Call the function to check Chrome's password settings
check_chrome_passwords()
Note that this code uses the Selenium library to automate browser actions and retrieve information from the Chrome settings page. Make sure you have installed the Selenium library and have the Chrome WebDriver (chromedriver) downloaded and properly configured.
Checking “Passwords” settings
To check your “Passwords” settings in Google Chrome, follow these steps:
1. Open the Chrome browser on your Windows 10 PC.
2. Click on the three-dot menu icon in the top-right corner of the browser window.
3. Select “Settings” from the drop-down menu.
4. Scroll down and click on “Passwords” in the “Autofill” section.
5. Here, you can see a list of websites and their saved passwords. If Chrome isn’t remembering passwords, ensure that the “Offer to save passwords” toggle is turned on.
6. You can also manage individual website passwords by clicking on the three-dot menu icon next to each entry and selecting “Details” or “Remove.”
7. If you’re still experiencing issues with Chrome not remembering passwords, you can try clearing your browsing data by going to “Privacy and security” > “Clear browsing data” and selecting the relevant options.
8. Additionally, make sure your Chrome browser and Windows 10 are up to date, as outdated software can sometimes cause issues.
Remember, these steps should help resolve most password-saving issues in Chrome.
Clearing cache and cookies
To resolve the Chrome password saving issue, clearing cache and cookies can be an effective solution. These temporary files and data can sometimes interfere with the autofill password feature, causing problems for users. Here’s a quick guide on how to clear cache and cookies in Google Chrome:
1. Open Google Chrome and click on the three-dot menu in the top-right corner.
2. Select “Settings” from the drop-down menu.
3. Scroll down and click on “Advanced” to expand additional options.
4. Under the “Privacy and security” section, select “Clear browsing data.”
5. Choose the time range for which you want to clear the data (e.g., “Last hour,” “Last 24 hours,” “All time”).
6. Check the boxes for “Cookies and other site data” and “Cached images and files.”
7. Click on the “Clear data” button.
Clearing cache and cookies can refresh the browser’s settings and potentially fix the autofill password issue. Remember to sign back into your accounts after this process.
If the issue persists, you can try other solutions such as updating Chrome, disabling extensions, or resetting Chrome settings.
Removing unwanted programs
If you’re experiencing issues with Chrome’s password-saving feature, there are a few steps you can take to fix the problem. One common reason for this problem is unwanted programs interfering with the autofill password feature. To remove these unwanted programs, follow these steps:
1. Open Google Chrome’s Settings by clicking on the three dots in the top-right corner of the browser window and selecting “Settings.”
2. Scroll down and click on “Advanced” to expand the settings menu.
3. Under the “Privacy and security” section, click on “Site Settings.”
4. Scroll down to the “Permissions” section and click on “Autofill.”
5. Click on “Addresses and more” to access the autofill settings.
6. Under the “Addresses and more” section, you’ll see a list of websites that you’ve saved passwords for. Look for any websites that you don’t recognize or that might be causing the issue.
7. Click on the three dots next to the website and select “Remove.”
Resetting the browser to default settings
If you’re experiencing issues with Chrome’s password saving feature, resetting the browser to its default settings can often resolve the problem. To do this, follow these steps:
1. Open Google Chrome and click on the three-dot menu in the top-right corner of the browser window.
2. From the drop-down menu, select “Settings”.
3. Scroll down to the bottom of the page and click on “Advanced”.
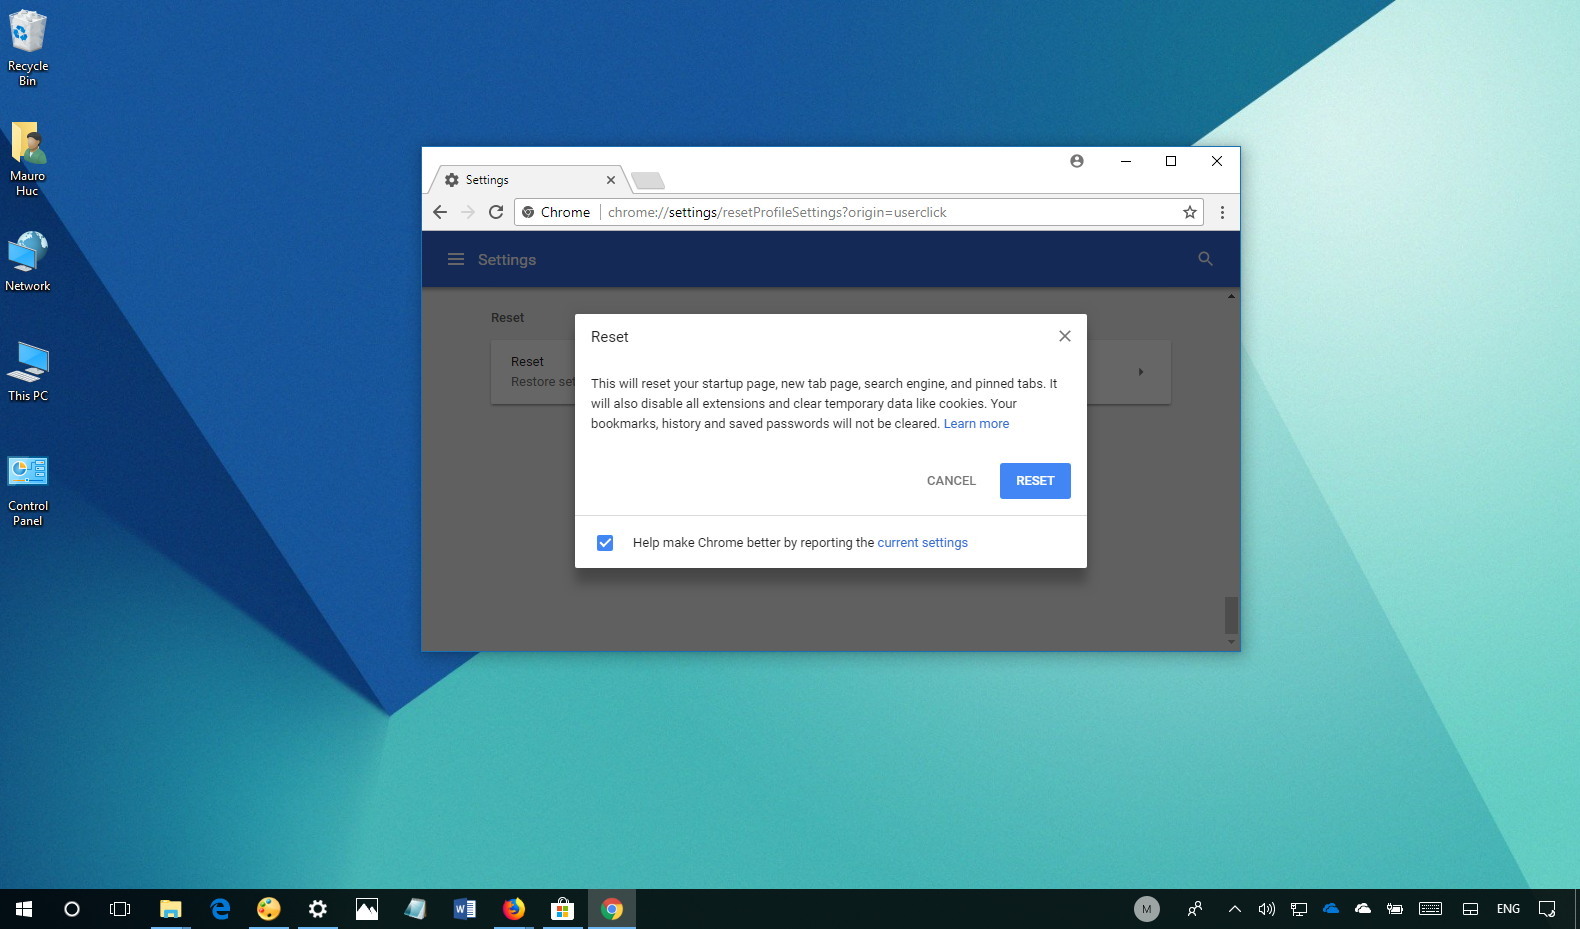
4. Under the “Reset and clean up” section, click on “Restore settings to their original defaults”.
5. A confirmation prompt will appear. Click on “Reset settings”.
By resetting Chrome to its default settings, you’ll effectively wipe any changes or customization you’ve made, including saved passwords. After the reset, you can re-enable the password saving feature and check if the issue is resolved.
Remember, resetting Chrome may also remove other settings, extensions, and bookmarks, so make sure to back up any important data before proceeding.
If resetting Chrome doesn’t fix the password saving issue, consider trying other solutions or seeking further assistance from Google or a tech support professional.
Checking for Chrome updates
If you’re experiencing issues with Chrome’s password saving feature, there are a few simple steps you can take to fix the problem. First, make sure your Chrome browser is up to date by checking for updates. To do this, go to the three-dot menu in the top-right corner of your browser and select “Settings.” Then, click on “About Chrome” in the left sidebar and Chrome will automatically check for updates. If an update is available, click on “Update” to install it.
If updating Chrome doesn’t fix the issue, you can try resetting your Chrome settings. To do this, go to Chrome’s Settings and click on “Advanced” at the bottom of the page. Then, scroll down to the “Reset and clean up” section and click on “Restore settings to their original defaults.” This will reset all your Chrome settings, but it should fix any issues with the password saving feature.
Remember to restart your browser after making any changes. Following these steps should help resolve any problems you’re experiencing with Chrome’s password saving feature.
Allowing Chrome to keep local data
If you’re experiencing issues with Chrome’s password saving feature, there are a few steps you can take to fix the problem.
First, make sure that Chrome is allowed to keep local data. To do this, go to Google Chrome’s Settings by clicking on the three dots in the top right corner and selecting “Settings”. Then, scroll down and click on “Advanced” to expand the settings options. Under the “Privacy and security” section, click on “Site Settings” and then “Cookies and site data”. Here, ensure that the toggle for “Allow sites to save and read cookie data (recommended)” is turned on.
If the issue persists, you can try clearing your browsing data. Again, go to Chrome’s Settings and click on “Privacy and security”. Under the “Clear browsing data” section, click on “Clear browsing data” and select the relevant time range and data types to clear.
If these steps don’t resolve the issue, you can try using a tool like AutoPilot to automatically sign into websites. AutoPilot simplifies the login process and can help if you’re experiencing difficulties with Chrome’s password saving feature.
Enabling Chrome to save passwords
If you’re experiencing issues with Google Chrome’s password saving feature, there are a few simple steps you can take to fix the problem.
First, ensure that the password saving feature is enabled in Chrome’s settings. To do this, open Chrome and click on the three dots in the top right corner. Then, select “Settings” and scroll down to “Autofill.” Make sure the “Passwords” toggle is turned on.
If the issue persists, try clearing your browser’s cache and cookies. This can help resolve any temporary glitches that may be causing the problem. To clear your cache and cookies, click on the three dots again, select “More tools,” and then choose “Clear browsing data.”
If these steps don’t work, consider using a password management tool like Microsoft AutoPilot. This tool can help you manage and save your passwords across devices, ensuring that you never lose access to your accounts.
Removing sites from the “Never Saved” list
- Introduction: Understand the issue of sites being added to the “Never Saved” list in Chrome
- Identify: Determine which specific sites are affected and added to the “Never Saved” list
- Check settings: Ensure that Chrome’s password saving feature is enabled and configured correctly
- Review site credentials: Verify the accuracy of the login credentials for the affected sites
- Clear browsing data: Remove any cached data or stored passwords that may be causing conflicts
- Disable extensions: Temporarily disable any extensions that could interfere with Chrome’s password saving functionality
- Update Chrome: Keep your Chrome browser up to date to benefit from the latest bug fixes and improvements
- Reset Chrome settings: Reset Chrome to its default settings to resolve any underlying issues
- Report the issue: Reach out to the Chrome support team to report the persistent “Never Saved” list problem
- Alternative password manager: Consider using a dedicated password manager like Microsoft Authenticator for enhanced password management

Disabling problematic Chrome extensions
If you’re experiencing issues with Chrome’s password saving feature, it might be due to problematic extensions. Disabling these extensions can help resolve the problem. Here’s how:
1. Open Google Chrome’s Settings by clicking on the three-dot menu in the top right corner and selecting “Settings.”
2. Scroll down and click on “Extensions” in the left sidebar.
3. Look for any extensions that might be causing the issue and toggle the switch next to them to disable them.
4. Restart Chrome for the changes to take effect.
5. Test the password saving feature again to see if the problem is resolved.
Disabling problematic Chrome extensions can often fix password saving issues. By following these steps, you can easily troubleshoot and resolve the problem. Remember to only disable extensions that you suspect might be causing the issue.