Why WiFi Says No Internet, Troubleshoot and Fix in Minutes
Discover the reasons behind your WiFi connection saying “No Internet” and learn how to troubleshoot and fix the issue within minutes with these simple steps.
Confirm if Internet Provider is Down
To confirm if your internet provider is down, try accessing websites or apps on other devices in your home. If they’re also unable to connect, it’s likely an ISP outage in your area. If only one device is affected, try resetting your modem or router by unplugging it for 30 seconds and plugging it back in. Check your network connection settings on your PC or device to ensure it’s connected to the correct Wi-Fi network and that the password is correct. If you’re still having trouble, update your network adapter driver using a program like Driver Updater to ensure it’s up to date. Most internet connection issues can be resolved by following these steps.
Reboot Modem and/or Router
If you’re experiencing internet connection difficulties, it’s possible that your modem and/or router needs a reboot. This step is often overlooked but can be the answer to your problem.
1. Locate your modem and/or router and unplug it from the power source.
2. Wait 30 seconds before plugging it back in.
3. Wait a few minutes for the device to fully reboot.
4. Check your computer, mobile devices, and other devices to see if they’re able to connect to the internet.
If you’re still experiencing issues, try resetting the network connection on your device or updating your network adapter driver with a Driver Updater tool.
Remember, internet connection issues can have a variety of causes, including an outage in your area or trouble with your ISP’s servers. But rebooting your modem and/or router is a quick and easy fix that anyone can try.
Check Router Settings for Correct Permissions
If you’re experiencing an Internet connection issue, one possible solution is to check your router settings for correct permissions. Follow these steps to ensure your router settings are configured properly:
1. Open your computer’s web browser and type in the router’s IP address in the address bar.
2. Log in to your router.
3. Check the permissions for your Wi-Fi network. Make sure that it is secured with a password and that only authorized devices are allowed to connect.
4. Ensure that the Wi-Fi indicator on your computer or device is turned on and that you have a Wi-Fi adapter installed.
5. If you’re still having issues, try resetting your router.
6. Finally, check for any updates for your router’s drivers and firmware.
By following these steps, you can quickly troubleshoot and fix Internet connection difficulties.
Perform a Network Reset
Performing a Network Reset can help fix internet connection errors on your Windows PC. This option can be found in the Settings app under Network & Internet > Status > Network Reset. Click “Reset now” to reset your network settings to their default configuration. This will remove any network adapters you’ve installed and reset all your network settings. You’ll need to set up your WiFi connection again after the reset.
Keep in mind that a Network Reset should be used as a last resort, after trying other fixes like restarting your modem or router, checking for driver updates, or scanning for viruses. Internet outages and other external factors can also cause connectivity issues, so make sure to rule out those possibilities as well. If you’re still having trouble after a Network Reset, there may be more complex issues with your network, and you may need to consult a professional for assistance.
Understanding the “WiFi Connected But No Internet” Error Message
If you’re seeing the “WiFi Connected But No Internet” error message, you’re not alone. It’s a common problem that can be caused by a variety of factors, but there are steps you can take to troubleshoot and fix the issue quickly.
First, check if the problem is with your Wi-Fi network or your device. Try connecting another device to your network to see if it has internet access. If it does, then the problem is likely with your device.
Next, try these steps to fix the issue:
– Restart your device and your router
– Check your Wi-Fi indicator to make sure you’re connected to the right network
– Update your Wi-Fi adapter drivers
– Check if your IP settings are correct
– Try switching to a different Wi-Fi network or using cellular data
If none of these fixes work, there may be a problem with your internet connection or the websites you’re trying to access. Check if there are any internet outages or contact your internet service provider for help. Remember, there’s always a solution to your internet connection errors.
Troubleshooting “WiFi Connected But No Internet” on a Single Device
If you’re experiencing the “WiFi Connected But No Internet” error on a single device, there are a few simple steps you can take to troubleshoot and fix the issue.
First, check to see if other devices in your home are able to connect to the internet. If they are, the problem is likely isolated to the single device experiencing the issue.
Next, try resetting your router or modem by unplugging it for 30 seconds and plugging it back in. This can often resolve connectivity issues.
If the issue persists, check to see if your device is in airplane mode or has cellular data turned off. On a Windows PC, navigate to the WiFi indicator and ensure “Airplane mode” is turned off. On an iPhone, check the WiFi icon and make sure cellular data is turned on.
Finally, make sure your device is connected to the correct network and that the network is secured. On a Windows 10 device, check the “Internet secured” message next to the network name.
By following these simple steps, you can quickly troubleshoot and fix your “WiFi Connected But No Internet” issue, and get back online in minutes.
Troubleshooting “WiFi Connected But No Internet” on Multiple Devices
If you’re experiencing the “WiFi Connected But No Internet” issue on multiple devices, there are a few things you can try. First, restart your router and modem by unplugging them for 30 seconds and plugging them back in. If that doesn’t work, try forgetting the WiFi network on the device and reconnecting to it. Another option is to check if there are any internet connection problems in your area by visiting your internet service provider’s website. You can also try resetting your network settings on your device. If you’re seeing an internet error message, try clearing your browser cache and cookies. It’s also possible that there may be issues with the servers you’re trying to access. Finally, make sure that your device is up to date with the latest software updates. With these troubleshooting steps, chances are that you’ll be back online in no time.
Use the Windows Network Troubleshooter
If you’re experiencing internet connection problems, the Windows Network Troubleshooter can be a quick and easy solution to fix the issue. First, click on the WiFi indicator in your taskbar and select “Troubleshoot problems”. This will open the Troubleshooter which will diagnose and repair any issues with your internet connection. If you receive an error alert, follow the steps provided by the Troubleshooter to resolve the problem. If the Troubleshooter doesn’t find a solution, there may be other reasons for your internet access issue, such as a weak WiFi signal or an outdated network driver. Most of these causes can be easily fixed by resetting your router/modem or updating your network driver. Don’t let internet errors keep you tied up, use the Windows Network Troubleshooter to solve your internet connection issues in minutes.
Disable Proxy and Check Time Synchronization
To disable a proxy and check time synchronization:
1. Open the Control Panel and click on “Internet Options.”
2. Click on the “Connections” tab and then click on “LAN settings.”
3. Uncheck the box next to “Use a proxy server for your LAN.”
4. Click “OK” to save the changes.
Next, check your time synchronization settings:
1. Go to your device’s clock settings.
2. Ensure that “Set time automatically” is turned on.
3. If your device is not set to the correct time zone, adjust it accordingly.
Following these steps can help resolve internet connection issues related to proxies and time synchronization. If you continue to receive an error alert or message, there may be other factors at play. Consider seeking further assistance or troubleshooting steps.
Disable Fast Startup and Flush DNS Cache
If you’re experiencing an internet connection issue and receiving a “No Internet” error message, chances are it’s related to your WiFi connection. The first step to troubleshoot and fix this problem is to disable Fast Startup and flush the DNS cache.
To disable Fast Startup on Windows 10, follow these steps:
1. Open Control Panel and select Power Options
2. Click “Choose what the power buttons do”
3. Click “Change settings that are currently unavailable”
4. Uncheck “Turn on fast startup”
5. Click “Save changes”
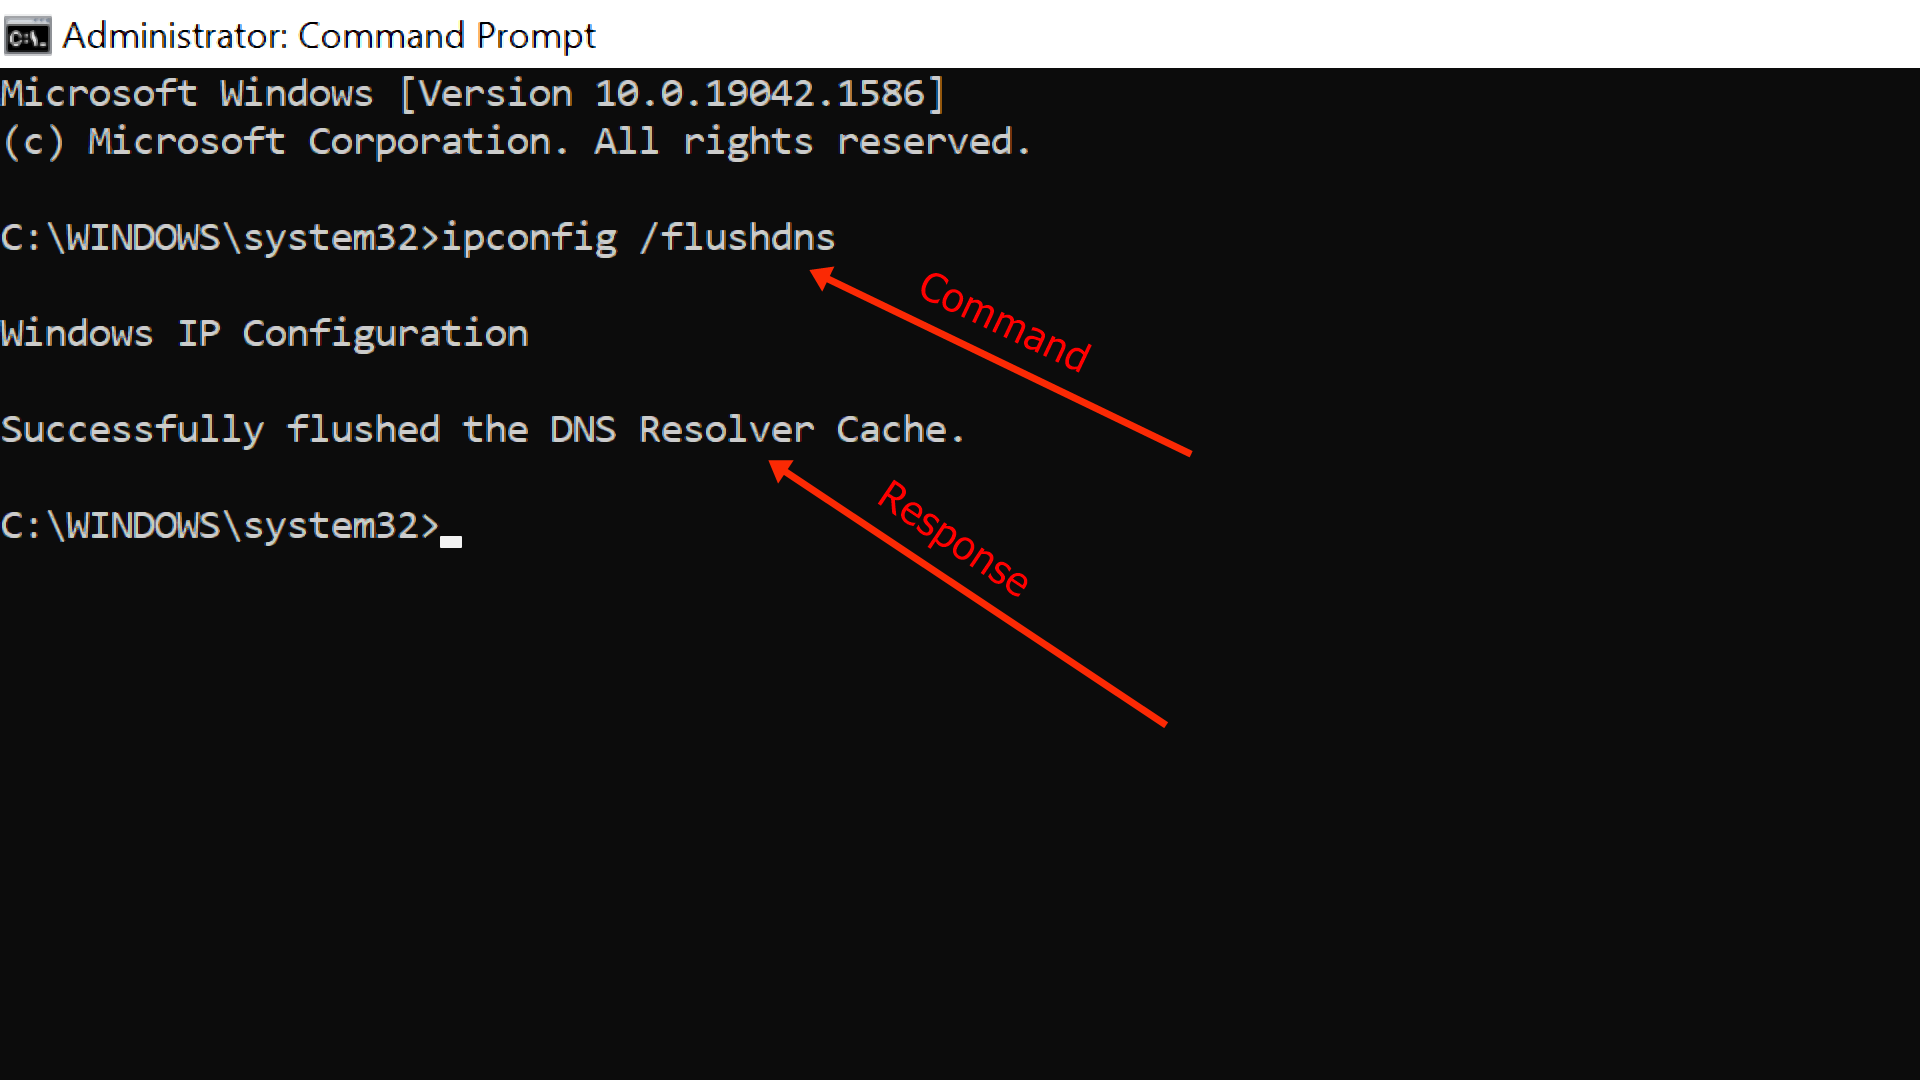
To flush the DNS cache on Windows, follow these steps:
1. Open Command Prompt as an administrator
2. Type “ipconfig /flushdns” and press enter
If you’re using an iPhone, iPad, or Android device, try restarting your device or resetting your network settings. For Smart TVs, Samsung, Android TV, and OnePlus devices, restart your TV or device and check for any available updates.
It’s baffling when the internet connection issue is only happening in certain areas of the house, but the answer may be as simple as moving your router to a central location. And if none of these solutions tide you over, post your question online and see if anyone has a solution.
Update Network Adapter Driver and Check IP Address Validity
To troubleshoot the “WiFi Says No Internet” error, the first step is to update your Network Adapter Driver.
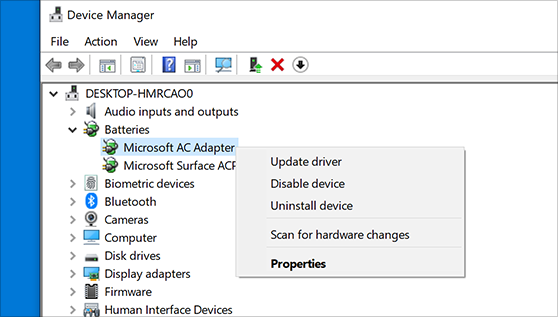
1. Press the Windows key + X and select Device Manager from the list.
2. Expand the Network Adapters category, right-click on your adapter, and select Update Driver.
3. Select “Search automatically for updated driver software” and follow the instructions to install the latest driver.
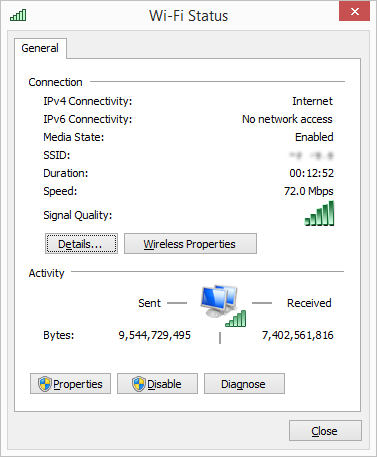
It is also important to check the IP Address Validity.
1. Open the Command Prompt by pressing the Windows key + R and typing “cmd”.
2. Type “ipconfig” and press Enter.
3. Check that the IPv4 Address, Subnet Mask, and Default Gateway are correct.
If the issue persists, try resetting your router and reconnecting your device. Unplug the power cord from your router for 30 seconds and plug it back in. Wait for the router to fully reboot before reconnecting your device.
If you still see the “WiFi Says No Internet” error, contact your internet service provider for further assistance.
Change DNS Server Address and Reset TCP/IP Configuration
To change your DNS server address and reset TCP/IP configuration, follow these steps:
1. Press the Windows key + R to open the Run dialog box.
2. Type cmd and press Enter to open the Command Prompt.
3. Type ipconfig /release and press Enter to release the current IP address.
4. Type ipconfig /flushdns and press Enter to clear the DNS resolver cache.
5. Type ipconfig /renew and press Enter to obtain a new IP address.
6. Type netsh int ip reset and press Enter to reset the TCP/IP stack.
7. Type netsh winsock reset and press Enter to reset the Winsock catalog.
8. Restart your computer and try connecting to the internet again.
If you still see the “No Internet” error message, try restarting your modem and router, or contact your internet service provider for further assistance. With these simple steps, you can troubleshoot and fix your WiFi connection in just a few minutes.
Turn off IPv6 and Run a Malware Scan
To troubleshoot a “WiFi says no internet” error message, try turning off IPv6 and running a malware scan. First, open the Control Panel and navigate to Network and Sharing Center. Click on Change adapter settings and right-click on your WiFi connection. Select Properties and uncheck Internet Protocol Version 6 (TCP/IPv6).
Next, run a malware scan on your system using your preferred antivirus software. If any threats are detected, follow the recommended steps to remove them.
If the issue persists, try resetting your router or contacting your internet service provider. It’s baffling when your WiFi suddenly stops working, but with these steps, you can quickly troubleshoot and fix the problem in minutes.
This solution works for various devices, including Windows 10, Windows 8, iPad, iPhone WiFi icon, Android TV, smart TV, Samsung, OnePlus, and Android phone. Don’t let a “WiFi says no internet” error post a tide of frustration in your house. Follow these steps for a solution and get your internet secured.
Temporarily Disable Firewall and Antivirus
To temporarily disable your Firewall and Antivirus, follow these steps:
1. Click on the Windows Start menu and search for “Windows Security.”
2. Open Windows Security and select “Virus & threat protection.”
3. Click on “Manage settings” under “Virus & threat protection settings.”
4. Toggle “Real-time protection” to the off position.
5. Go back to the previous screen and select “Firewall & network protection.”
6. Click on “Private network” and toggle “Windows Defender Firewall” to the off position.
Remember to re-enable your Firewall and Antivirus after troubleshooting your WiFi issue. If this solution does not work, try resetting your modem or contacting your internet service provider.
With these steps, you can quickly and easily disable your Firewall and Antivirus to troubleshoot your WiFi issue.
Resolve “WiFi Connected But No Internet” across Entire Network
If you’re experiencing the “WiFi Connected But No Internet” error across your entire network, there are a few steps you can take to get back online. First, try restarting your router and modem. If that doesn’t work, check your network settings to ensure you’re connected to the right network and that your IP settings are correct. If you’re still having issues, try resetting your network settings on your device. You may also want to disable any VPNs or firewalls you have running. If none of these solutions work, it may be time to contact your internet service provider for further assistance.
Remove WiFi Range Extenders and Check MAC Address Filtering
To troubleshoot WiFi connectivity issues, try removing any WiFi range extenders and checking MAC address filtering. Remove any WiFi range extenders that may be causing interference with your network. Next, check if MAC address filtering is enabled on your router. This feature only allows devices with specific MAC addresses to connect to the network. To disable MAC address filtering: access your router settings, go to the wireless settings, and disable MAC address filtering. If that doesn’t work, try resetting your modem and router. To reset your modem and router: unplug both devices, wait a few minutes, plug in the modem first, then the router. This should reset the network and resolve any connectivity issues. Keep in mind that some devices may need to be reconnected to the network after resetting it.
Update Router Firmware and Check Mobile Data Hotspots
If your WiFi says “No Internet”, it might be time to update your router firmware. This can fix any bugs or compatibility issues that may be causing the problem.
To update your router firmware, access your router’s settings through a web browser and look for the firmware update option. Follow the instructions provided by your router manufacturer to complete the process.
Additionally, if you’re using a mobile data hotspot, check that it has enough data and signal strength. If you’re still having issues, try resetting your router and modem by unplugging them for a few minutes and plugging them back in.
Pro Tip: If you’re using Windows 10, make sure the “Internet Secured” message is displayed. If not, click on the WiFi icon and select “Forget Network”. Then, reconnect and enter your password.
By following these steps, you can troubleshoot and fix your WiFi connection in just a few minutes, avoiding frustrating internet error messages and ensuring your systems stay connected.
Workable Fixes to Solve “WiFi Connected But No Internet” Error Message
- Unplug the power cables from the router and modem.
- Wait for at least 30 seconds before plugging them back in.
- Wait for the router and modem to fully reboot before trying to connect to the internet.
Method 2: Check your Network Connections
- Open Network and Sharing Center by clicking on the network icon in the taskbar.
- Click on the Change adapter settings option.
- Right-click on the WiFi network and select Disable.
- Wait for a few seconds and then right-click on the WiFi network and select Enable.
- Try to connect to the internet again.
Method 3: Clear your DNS Cache
- Open Command Prompt by typing cmd in the search bar.
- Right-click on Command Prompt and select Run as administrator.
- Type ipconfig /flushdns and press Enter.
- Wait for the command to complete and then try to connect to the internet again.
Method 4: Update your Network Adapter Drivers
- Open Device Manager by typing devmgmt.msc in the search bar.
- Expand the Network Adapters category.
- Right-click on your WiFi adapter and select Update driver.
- Select Search automatically for updated driver software.
- Wait for the update to complete and then try to connect to the internet again.
Method 5: Disable your Antivirus Software
- Open your antivirus software.
- Find the option to disable the firewall or internet protection.
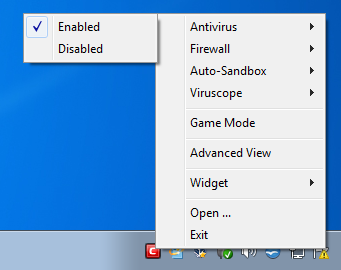
- Disable the firewall or internet protection.
- Try to connect to the internet again.