Fixing Disk Read Only Issue
Unlocking the Secrets of Disk Read Only: A Comprehensive Guide
Understanding Read-Only Drives
If you’re experiencing a disk read-only issue, there are a few things you can try to resolve it. First, check the file system permissions for the drive. Right-click on the drive, go to Properties > Security tab, and ensure that you have the necessary permissions to write to the drive.
If that doesn’t work, you can try running Diskpart, a built-in Windows tool. Open a command prompt and type ‘diskpart‘. Then, enter the command ‘list disk‘ to identify the disk number of the read-only drive. Select the disk by using the command ‘select disk [disk number]‘, and then enter ‘attributes disk clear readonly‘ to clear the read-only attribute.
Another option is to format the drive. Keep in mind that formatting will erase all data on the drive, so make sure to back up anything important. Right-click on the drive, go to Format, and choose the desired file system and cluster size.
If none of these solutions work, it’s possible that the drive itself is malfunctioning and may need to be replaced.
Methods to Format and Remove Read-Only Status
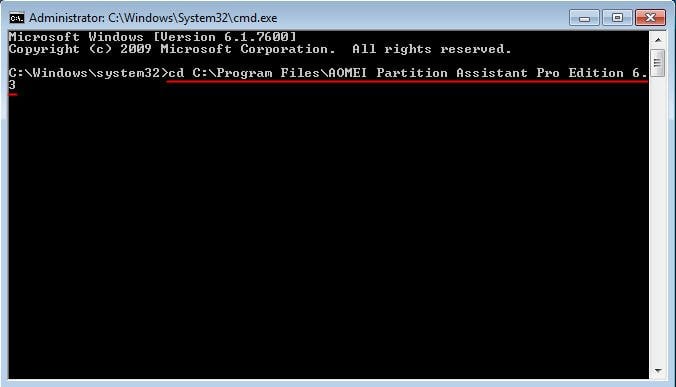
- Open the Command Prompt by pressing Windows Key + R, typing cmd, and pressing Enter.
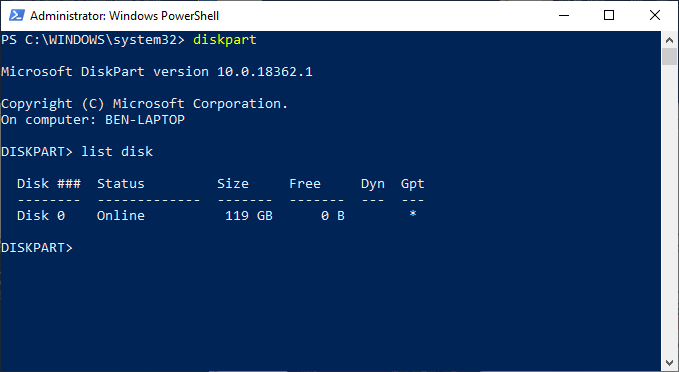
- Type diskpart and press Enter to open the Diskpart utility.
- Type list disk and press Enter to display a list of available disks.
- Identify the disk that is read-only and note its number.
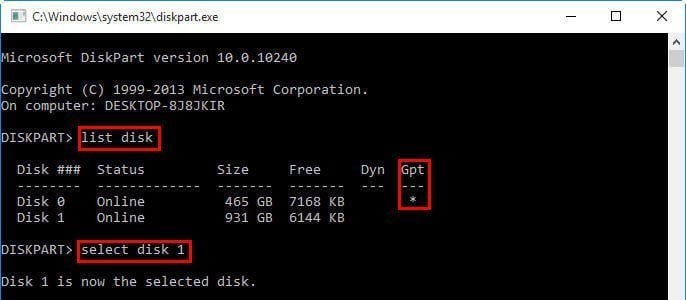
- Type select disk [disk number] (replace [disk number] with the actual disk number) and press Enter to select the read-only disk.
- Type attributes disk clear readonly and press Enter to remove the read-only status from the disk.
- Exit the Diskpart utility by typing exit and pressing Enter.
- Restart your computer to apply the changes.
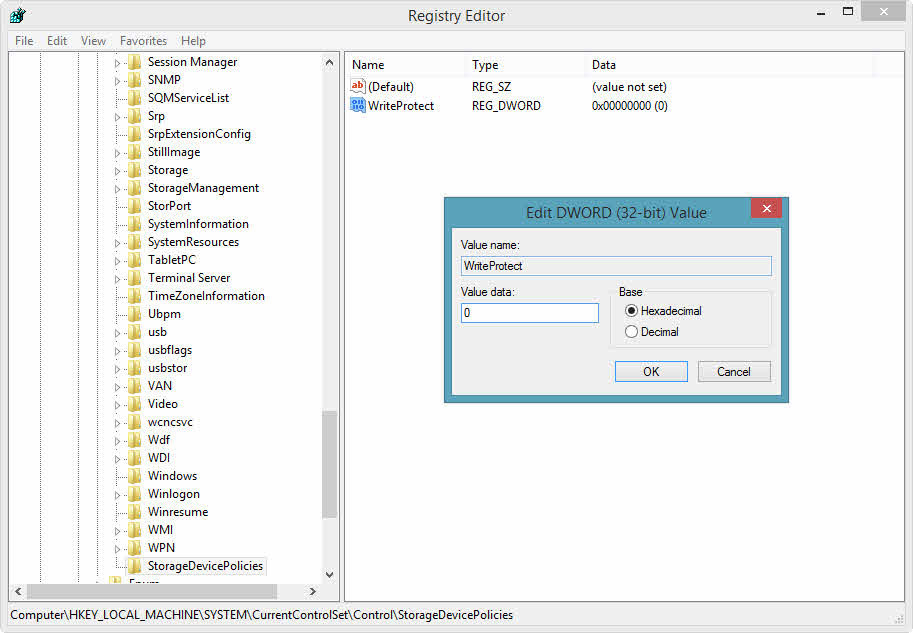
Method 2: Modifying Registry Entries
- Press Windows Key + R, type regedit, and press Enter to open the Registry Editor.
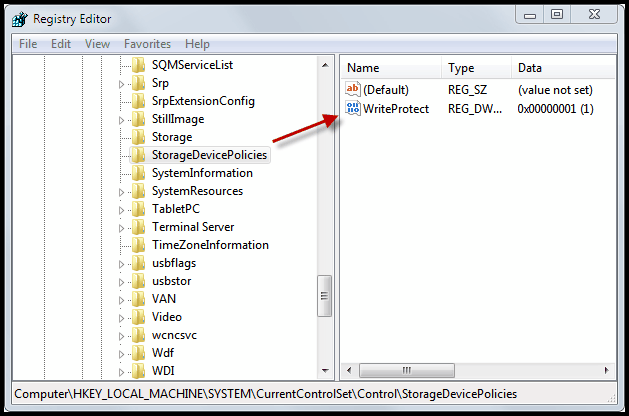
- Navigate to the following key: HKEY_LOCAL_MACHINESYSTEMCurrentControlSetControlStorageDevicePolicies.
- If the StorageDevicePolicies key doesn’t exist, right-click on Control, select New, and then choose Key. Name the key as StorageDevicePolicies.
- Right-click on StorageDevicePolicies, select New, and then choose DWORD (32-bit) Value. Name the value as WriteProtect.
- Double-click on the WriteProtect value and set its Value data to 0 to disable write protection.
- Click OK and close the Registry Editor.

- Restart your computer for the changes to take effect.
Method 3: Using Disk Management
- Press Windows Key + X and select Disk Management from the menu.
- Locate the read-only disk in the list of drives.
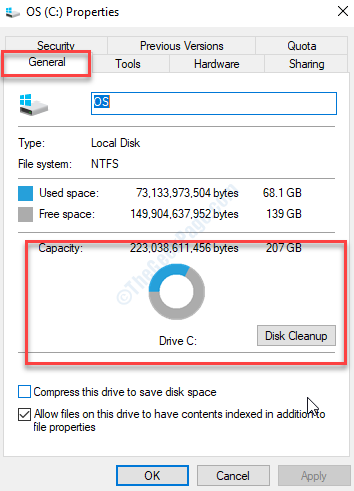
- Right-click on the read-only disk and select Properties.
- In the General tab, uncheck the Read-only option.
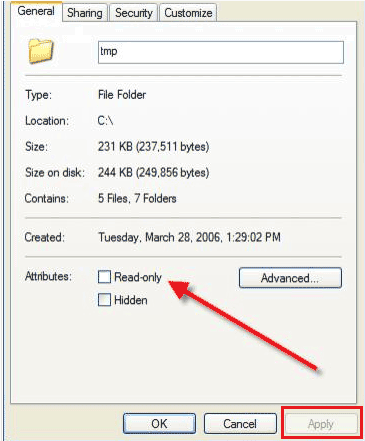
- Click OK to save the changes.
- Restart your computer for the changes to take effect.
Clearing Read-Only with Third-Party Software
To clear the read-only state on your disk, you can use third-party software like Minitool Partition Wizard. Here’s how:
1. Launch Minitool Partition Wizard.
2. Select the disk you want to fix from the list of available drives.
3. Right-click on the disk and choose “Clear Read-Only Attributes” from the context menu.
4. Confirm the action when prompted.
5. Wait for the process to complete.
6. Once finished, close Minitool Partition Wizard.
python

import os
def is_read_only(path):
"""
Check if a file or directory is read-only.
Args:
path (str): Path to the file or directory.
Returns:
bool: True if the file or directory is read-only, False otherwise.
"""
return not os.access(path, os.W_OK)
# Example usage
file_path = 'path/to/your/file.txt'
directory_path = 'path/to/your/directory'
print(f'Is file read-only? {is_read_only(file_path)}')
print(f'Is directory read-only? {is_read_only(directory_path)}')
This code snippet defines a function `is_read_only` that takes a file or directory path as an argument and checks if it is read-only by using the `os.access` function with the `os.W_OK` flag. The function returns `True` if the file or directory is read-only, and `False` otherwise.
Please note that this code operates on the permissions of the file or directory within the file system and does not directly manipulate the disk’s read-only setting.
Changing Read-Only Permissions in Windows
To fix the disk read only issue in Windows, you can change the read-only permissions of your files and folders. Follow these steps:
1. Open the Command Prompt as an administrator by pressing Windows + X and selecting “Command Prompt (Admin).”
2. In the Command Prompt window, type “diskpart” and press Enter. This will open the Diskpart utility.
3. Type “list disk” and press Enter to view the list of available disks.
4. Identify the disk number (Disk #) of the drive you want to change the permissions for.
5. Type “select disk #” (replace # with the disk number) and press Enter.
6. To remove the read-only attribute, type “attributes disk clear readonly” and press Enter.
7. Close the Command Prompt window.
Adjusting Hard Drive Settings in Registry Editor
To adjust hard drive settings in Registry Editor and fix the disk read-only issue, follow these steps:
1. Press Windows + R to open the Run dialog box.
2. Type “regedit” and hit Enter to open Registry Editor.
3. In Registry Editor, navigate to the following key: HKEY_LOCAL_MACHINESYSTEMCurrentControlSetControlStorageDevicePolicies.
4. If the StorageDevicePolicies key doesn’t exist, right-click on the Control key, select New, and then Key. Name it “StorageDevicePolicies.”
5. Right-click on the newly created StorageDevicePolicies key, select New, and then DWORD (32-bit) Value. Name it “WriteProtect.”
6. Double-click on the WriteProtect value and set its data to “0” to disable write protection.
7. Close Registry Editor and restart your computer.
Note: Be cautious while making changes in the Registry Editor, as any incorrect modification can cause system issues. Always back up your important data before proceeding.
These steps should help you adjust the hard drive settings and resolve the disk read-only issue.
Fixing Disk Read-Only Errors: Common FAQs
-
Check the physical write protection switch on the disk:
- Locate the physical write protection switch on the disk.
- If the switch is in the “read-only” position, toggle it to the “read-write” position.
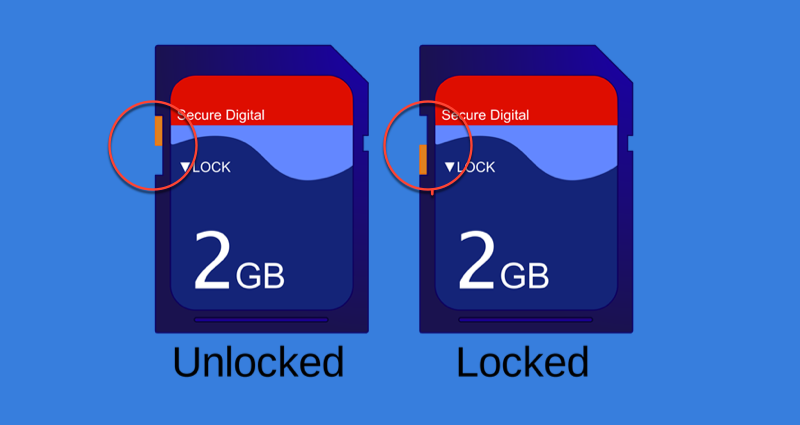
- Retry accessing and modifying the disk to see if the issue is resolved.
-
Change the disk attributes using Command Prompt:
- Open the Command Prompt by pressing Win+R, typing “cmd”, and pressing Enter.
- Type diskpart and press Enter.
- Type list disk and press Enter to display a list of available disks.
- Type select disk [disk number] (replace [disk number] with the number of the read-only disk) and press Enter.
- Type attributes disk clear readonly and press Enter to remove the read-only attribute from the disk.
- Exit Command Prompt and check if the disk is now writable.
-
Modify the disk properties in Disk Management:
- Press Win+R, type “diskmgmt.msc”, and press Enter to open Disk Management.
- Locate the read-only disk in the list of drives.
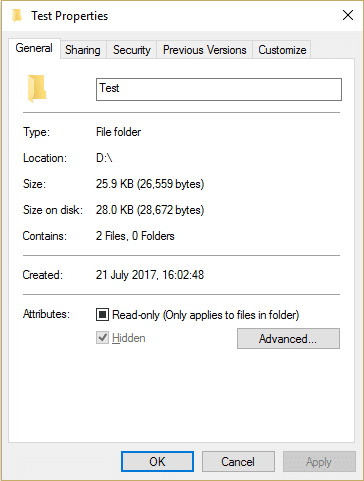
- Right-click on the disk and select Properties.
- In the properties window, navigate to the General tab.
- Ensure that the “Read-only” checkbox is unchecked.
- Click OK to save the changes and close the properties window.
- Attempt to write to the disk and check if the issue is resolved.
-
Disable write protection using the Registry Editor:
- Press Win+R, type “regedit”, and press Enter to open the Registry Editor.
- Navigate to the following location: HKEY_LOCAL_MACHINESYSTEMCurrentControlSetControlStorageDevicePolicies.

- If the WriteProtect key exists, double-click it and set its value to 0.
- If the WriteProtect key does not exist, right-click on the StorageDevicePolicies key, select New, and then DWORD (32-bit) Value.
- Name the new value WriteProtect and set its value to 0.
- Close the Registry Editor and restart the computer.
- Try accessing the disk to see if it is no longer read-only.
Troubleshooting Read-Only Issues on External Hard Drives
If you’re facing read-only issues with your external hard drive, here are some steps to help you fix the problem.
First, make sure you have the necessary file system permissions to access and modify the files on the drive. If you’re using Windows, open an elevated Command Prompt by pressing Windows key + X and selecting “Command Prompt (Admin).” Then, enter the following command: diskpart.
Next, run a disk check to identify and fix any errors on the drive. In the Command Prompt, type chkdsk /f D: (replace “D:” with the correct drive letter) and press Enter.
If the issue persists, try clearing the disk attributes. Open Command Prompt as an administrator and run the following command: diskpart. Then, type list disk to identify the disk number of your external drive. Once you have the disk number, enter the command select disk # (replace “#” with the appropriate number) and press Enter. Finally, type attributes disk clear readonly and hit Enter to clear the read-only state.
If none of these steps resolve the issue, it’s recommended to contact the manufacturer’s support for further assistance.
Remember, it’s always important to back up your files before attempting any troubleshooting steps to avoid any potential data loss.
Ways to Disable Read-Only for External Hard Drives
To disable read-only for external hard drives, follow these steps:
1. First, open Command Prompt as an administrator.
2. Type diskpart and press Enter.
3. Type list disk and press Enter to see a list of all connected disks.
4. Identify the disk number of your external hard drive. Look for the one with the appropriate size and make sure it’s not your main system disk.
5. Type select disk [disk number] and press Enter, replacing [disk number] with the actual disk number of your external hard drive.
6. Type attributes disk clear readonly and press Enter to clear the read-only attribute.
7. Exit Command Prompt.
Now your external hard drive should no longer be read-only and you can modify its contents as needed.
Note: If you encounter any errors or issues during this process, it’s recommended to check your disk for errors using a disk check utility or try the steps on a different computer if possible.
Conclusion: Resolving Read-Only Status and Potential Solutions
To fix the disk read-only issue, follow these steps:
1. Run Diskpart: Open the Command Prompt as an administrator and type “diskpart” to launch the disk partitioning tool.
2. Select the disk: Type “list disk” to display all the disks connected to your computer. Identify the disk number (Disk #) of the affected drive.
3. Clear disk attributes: Type “select disk #” (replace “#” with the disk number) and then enter “attributes disk clear readonly”. This will remove the read-only status from the disk.
4. Update drivers and software: Make sure your Windows operating system and drivers are up to date. This can help resolve any compatibility issues causing the read-only problem.
5. Check file system permissions: Ensure that you have the necessary permissions to access and modify files on the disk. Right-click on the disk, go to “Properties,” and navigate to the “Security” tab to adjust permissions if needed.
By following these steps, you should be able to resolve the read-only status and regain full control over your disk. Remember to back up your important files before making any changes, just in case something goes wrong.