Windows 10 WiFi Troubleshooting Guide
Navigating the digital world can be a breeze, but when it comes to WiFi connectivity issues on Windows 10, things can get a bit tangled. Fear not, as this troubleshooting guide is here to untangle those pesky WiFi problems and ensure smooth internet sailing for all Windows 10 users.
Troubleshooting network problems in Windows
If you’re experiencing Wi-Fi issues on your Windows 10 device, there are several troubleshooting steps you can try to fix the problem.
First, ensure that your Wi-Fi is turned on and that you’re connected to a network. If you’re having trouble connecting, check if your Wi-Fi router is working properly and if other devices can connect to the same network.
Next, update your network adapter driver. To do this, press the Windows key + X and select “Device Manager.” Expand the “Network adapters” category, right-click on your network adapter, and choose “Update driver.”
If the issue persists, you can use the built-in Windows Network Troubleshooter. Simply right-click on the Wi-Fi icon in the system tray, select “Troubleshoot problems,” and follow the on-screen instructions.
If none of these solutions work, consider reaching out to Microsoft Support for further assistance. Remember, troubleshooting network problems can vary depending on the specific situation, so it’s important to explore different methods to find the best solution for your case.
Things to try first
- Check your hardware: Ensure that your WiFi router is turned on and properly connected. Also, make sure your computer’s WiFi adapter is enabled.
- Restart your devices: Sometimes a simple restart can resolve connectivity issues. Restart your computer, WiFi router, and modem.
- Update your drivers: Outdated or incompatible WiFi drivers can cause problems. Use Windows Update or visit your device manufacturer’s website to download the latest drivers.
- Check for Windows updates: Make sure your Windows 10 operating system is up to date. Updates often include bug fixes and improvements that can address WiFi issues.
- Run the Network Troubleshooter: Windows 10 has a built-in Network Troubleshooter that can automatically detect and fix common WiFi problems. Go to Settings > Network & Internet > Status > Network troubleshooter.
- Forget and reconnect to the network: Sometimes, WiFi connection issues can be resolved by forgetting the network and reconnecting to it. Go to Settings > Network & Internet > Wi-Fi, select the network, and click “Forget.” Then reconnect by selecting the network again and entering the password.
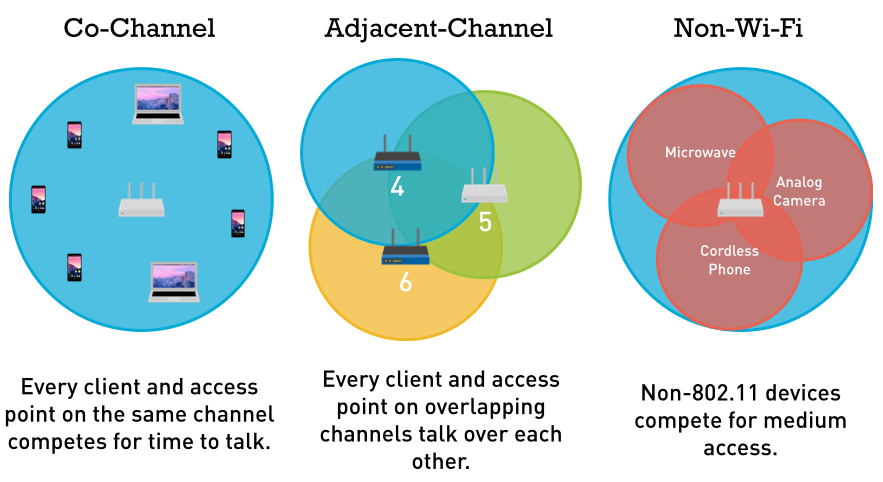
- Change your WiFi channel: Overlapping WiFi channels can cause interference and poor signal quality. Access your router settings through a web browser and try changing the WiFi channel to a less congested one.
- Disable VPN or Proxy: If you are using a VPN or proxy, try disabling it temporarily to see if it affects your WiFi connection. Sometimes these services can interfere with network connectivity.
- Reset TCP/IP stack: Resetting the TCP/IP stack can help resolve network issues. Open Command Prompt as an administrator and type “netsh int ip reset” (without quotes), then press Enter. Restart your computer afterward.
- Check for software conflicts: Certain software applications or security programs can conflict with your WiFi connection. Temporarily disable antivirus or firewall software and check if the issue persists.
Uninstall network adapter
To uninstall your network adapter in Windows 10, follow these steps:
1. Press the Windows key + X and select Device Manager from the list.
2. In the Device Manager window, expand the Network adapters category.
3. Right-click on your network adapter and select Uninstall device.
4. A confirmation window will appear. Check the box that says “Delete the driver software for this device” and click Uninstall.
5. Wait for the uninstallation process to complete, and then restart your machine.
After restarting, Windows will automatically reinstall the network adapter driver. This can help resolve issues with your Wi-Fi connection. If you’re still experiencing problems, make sure your Wi-Fi router is working properly and that you’re within range. You can also try updating the network adapter driver by using Windows Update or downloading the latest driver software from the manufacturer’s website.
Update network adapter driver
1. Open the Windows Start menu and type “Device Manager” in the search bar. Click on the top result to open the Device Manager.
2. In the Device Manager window, expand the “Network adapters” section to see the list of network adapters installed on your machine.
3. Right-click on your network adapter and select “Update driver” from the context menu.
4. Choose the option to automatically search for updated driver software. Windows will search online and install any available updates for your adapter.
5. Once the update is complete, restart your computer to apply the changes.
Updating your network adapter driver can help resolve connection problems and improve internet connectivity. If you’re experiencing issues with your Wi-Fi network, updating the driver is one of the first troubleshooting steps to try.
Change network mode
Changing the network mode can help resolve Wi-Fi connectivity issues on your Windows 10 device. Follow these steps to change the network mode:
1. Click on the Wi-Fi icon in the taskbar, located in the bottom-right corner of your screen.
2. Select “Open Network & Internet settings” to open the Network settings page.
3. Under the “Change your network settings” section, click on “Wi-Fi” to access the Wi-Fi settings.
4. Scroll down and click on “Advanced options” to view additional Wi-Fi settings.
5. Under the “Preferred band” section, select the desired network mode from the drop-down menu.
(e.g., 2.4 GHz, 5 GHz, or Auto)
6. Once you’ve made your selection, close the settings window.
Changing the network mode can improve your Wi-Fi connection, especially if you’re experiencing slow or unstable internet speeds. If you’re still facing connectivity issues after changing the network mode, try other troubleshooting solutions or contact Microsoft Support for further assistance.
Manage Network adapter’s power management settings
To manage your network adapter’s power management settings in Windows 10, follow these steps:
1. Open the Device Manager by pressing Windows Key + X and selecting “Device Manager” from the menu.
2. Expand the “Network adapters” category to see your network adapters.
3. Right-click on your network adapter and select “Properties” from the context menu.
4. In the Properties window, go to the “Power Management” tab.
5. Uncheck the box that says “Allow the computer to turn off this device to save power.”
6. Click “OK” to save the changes.
By disabling power management for your network adapter, you can prevent any interruptions to your Wi-Fi connection caused by the device being turned off to save power.
If you continue to experience Wi-Fi connection problems, consider updating your network adapter driver. You can do this by visiting the manufacturer’s website or using Windows Update.
Remember, troubleshooting Wi-Fi issues can involve a variety of factors, so if these steps don’t resolve your problem, there may be other reasons for the connectivity issue.
Unblock web access through Firewall (temporarily)
If you’re experiencing issues accessing the web due to a firewall blocking your connection, follow these steps to temporarily unblock it on Windows 10:
1. Open the Start Menu and type “Windows Security” to open the Windows Security app.
2. Click on “Firewall & network protection” and then select “Allow an app through firewall.”
3. Click on “Change settings” and scroll down to find your web browser (e.g., Microsoft Edge, Google Chrome).
4. Check the boxes next to both “Private” and “Public” to allow the browser through the firewall.
5. Click “OK” to save the changes.
Note: Remember to re-enable the firewall once you’ve resolved the issue.
If you’re still encountering problems, it’s recommended to consult our Windows 10 WiFi Troubleshooting Guide for further assistance. This guide covers a variety of connection problems, including issues with internet connectivity, network adapters, and more.
Remember, Microsoft is continuously working to improve our products and provide you with the best WiFi experience.
Disable and Enable network connection
To disable or enable your network connection in Windows 10, follow these steps:
1. Click on the Start menu and select the Settings icon.
2. In the Settings window, click on Network & Internet.
3. On the left side, click on Wi-Fi or Ethernet, depending on your connection type.
4. Under the network name, toggle the Wi-Fi switch to disable or enable your Wi-Fi connection.
5. If you are using an Ethernet connection, click on Change adapter options and right-click on the Ethernet connection to disable or enable it.
If you are still experiencing connection problems, try the following troubleshooting steps:
1. Restart your router and modem.
2. Update your network adapter driver. Right-click on the Start menu and select Device Manager. Expand the Network adapters category, right-click on your network adapter, and select Update driver.
3. Run the built-in Windows network troubleshooter. Press the Windows key + R, type “msdt.exe /id NetworkDiagnosticsNetworkAdapter“, and press Enter.
4. Check if any software or antivirus is blocking your connection.
5. If all else fails, consider reaching out to your internet service provider for further assistance.
Remember, these steps may vary slightly depending on your specific Windows 10 version and device.
Forget Network and connect again
If you’re experiencing Wi-Fi connection issues on your Windows 10 device, we’ve got you covered. Here’s a concise troubleshooting guide to help you get back online quickly.
1. Restart your device and router. This simple step often resolves connectivity issues.
2. Check if your Wi-Fi is turned on. Click on the network icon in the taskbar and ensure it’s enabled.
3. Try forgetting your network and connecting again. Open the Wi-Fi settings, select your network, and click “Forget.” Then, reconnect by selecting the network again.
4. Update your network adapter driver. Open Device Manager, find your network adapter, right-click, and select “Update driver.”
5. Use the Windows Network Troubleshooter. Open the Settings app, go to “Network & Internet,” and select “Network troubleshooter” under the “Advanced network settings” section.
6. Reset your network settings. Open the Command Prompt as an administrator and enter the following command: netsh winsock reset. Then, restart your device.
Remember, these steps are just a starting point. If you’re still experiencing issues, consult our comprehensive Windows 10 WiFi Troubleshooting Guide for further assistance.